Using the AppGuide
Learn how to get the most out of the Cook iOS app with this comprehensive guide.
My Recipes Screen
The main screen shows all your recipes organized by folder. This is where you'll spend most of your time browsing and selecting recipes.
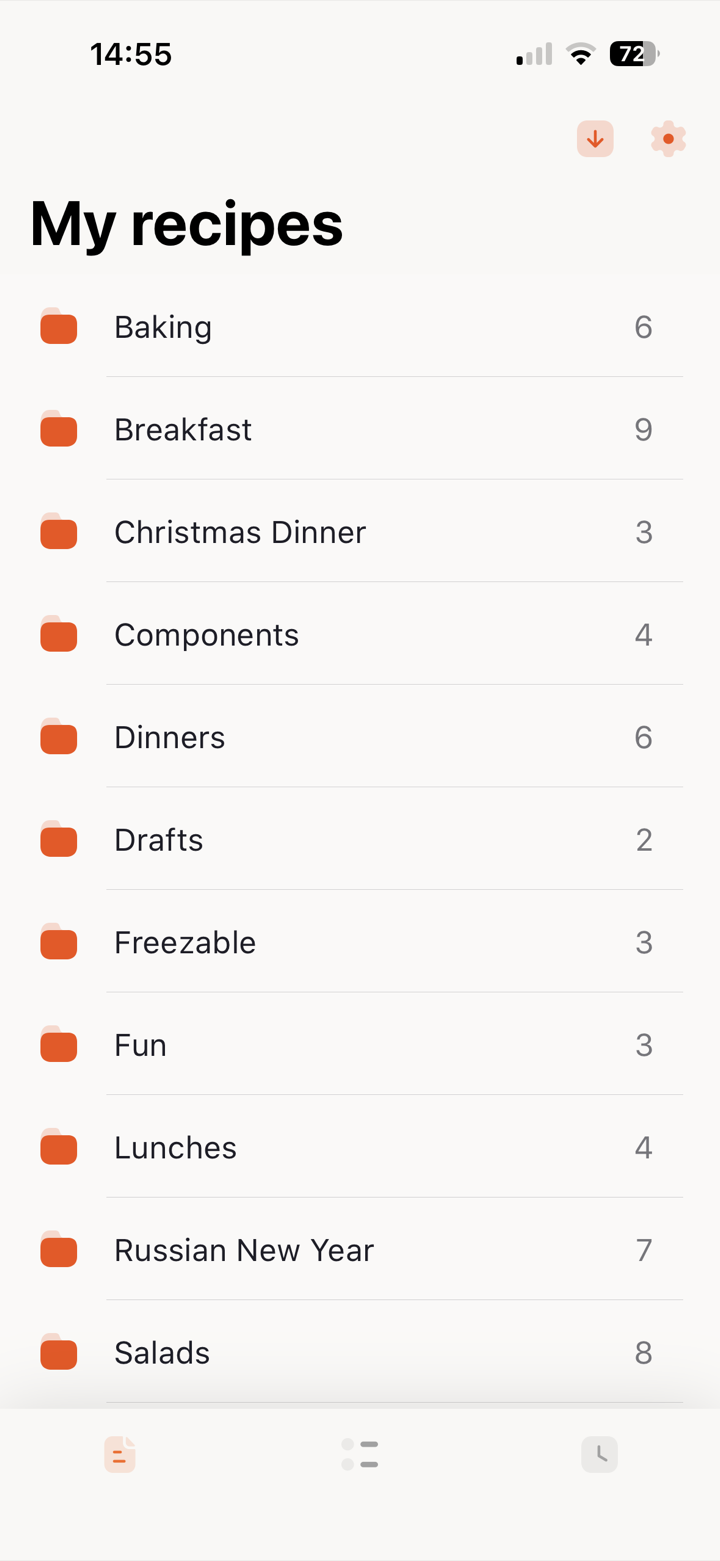
Navigating Folders
If your recipes are organized in folders, tap a folder to navigate into it. Use the back button to go up a level.
Refreshing
Pull down and release to refresh your recipes from the cloud. This checks for any changes made on other devices.
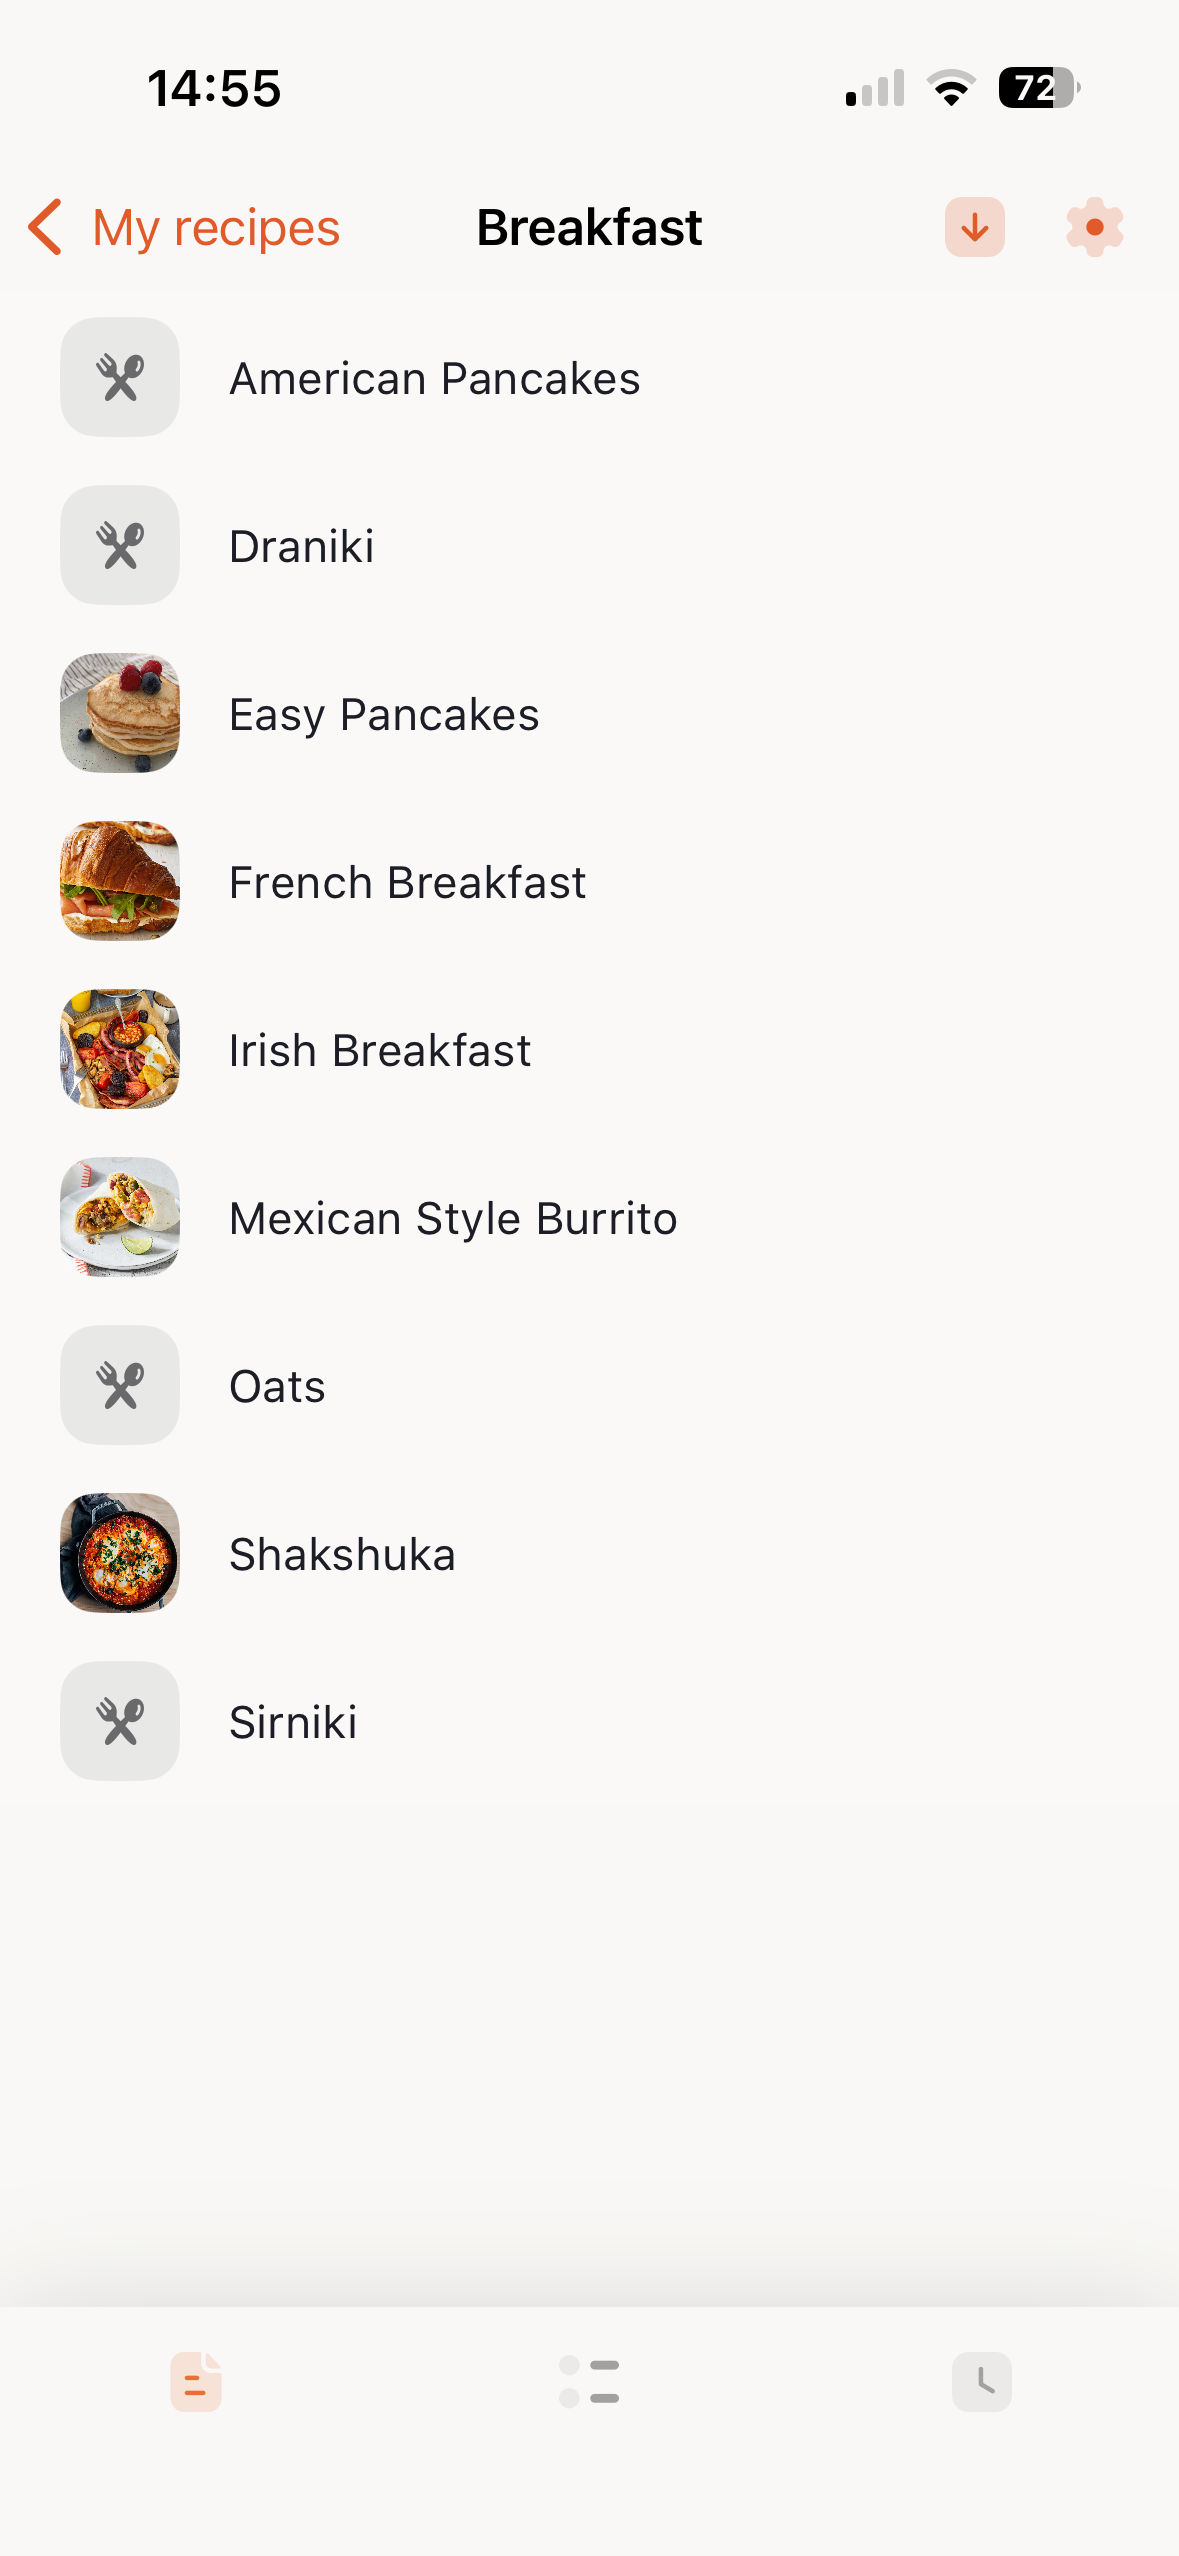
Viewing Recipes
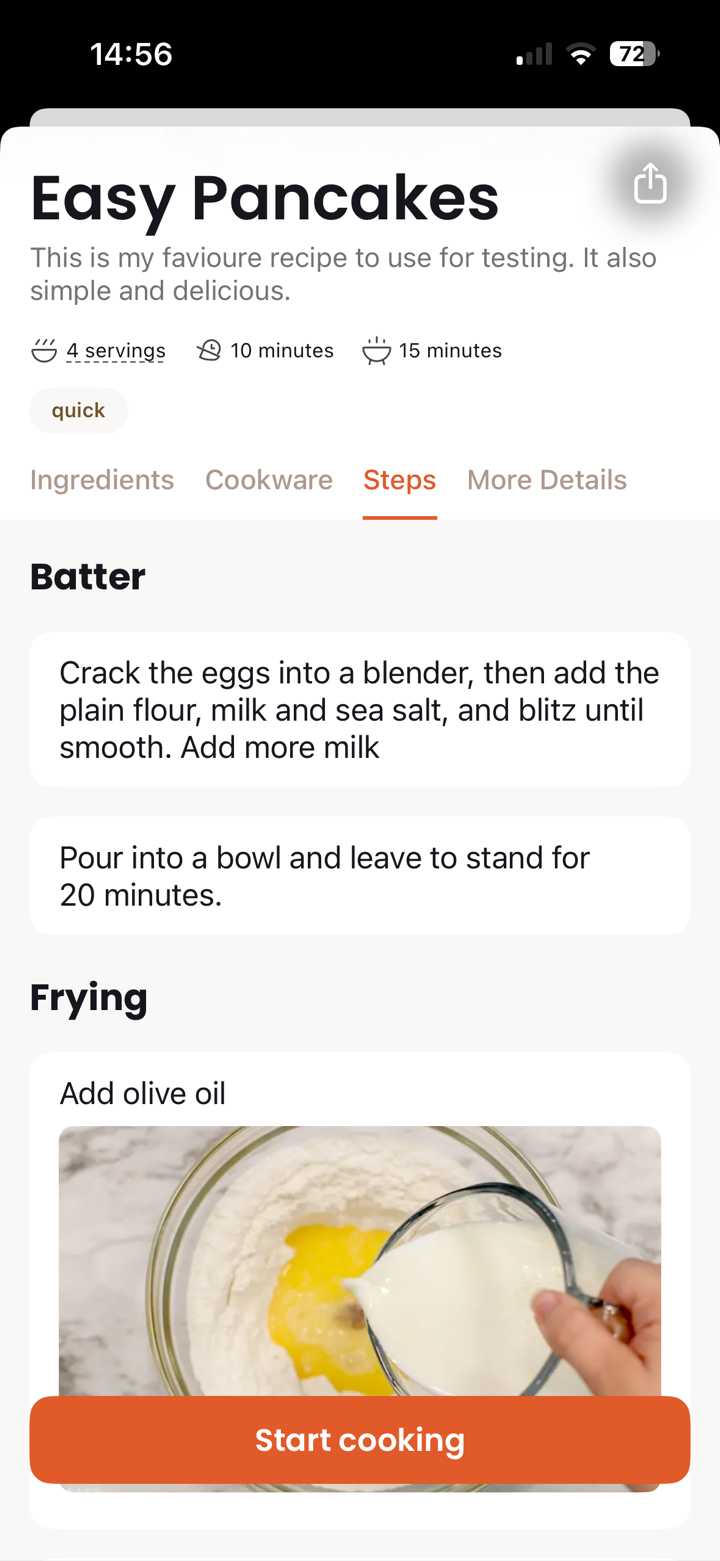
Tap any recipe to view its full details. The recipe view shows everything you need to cook.
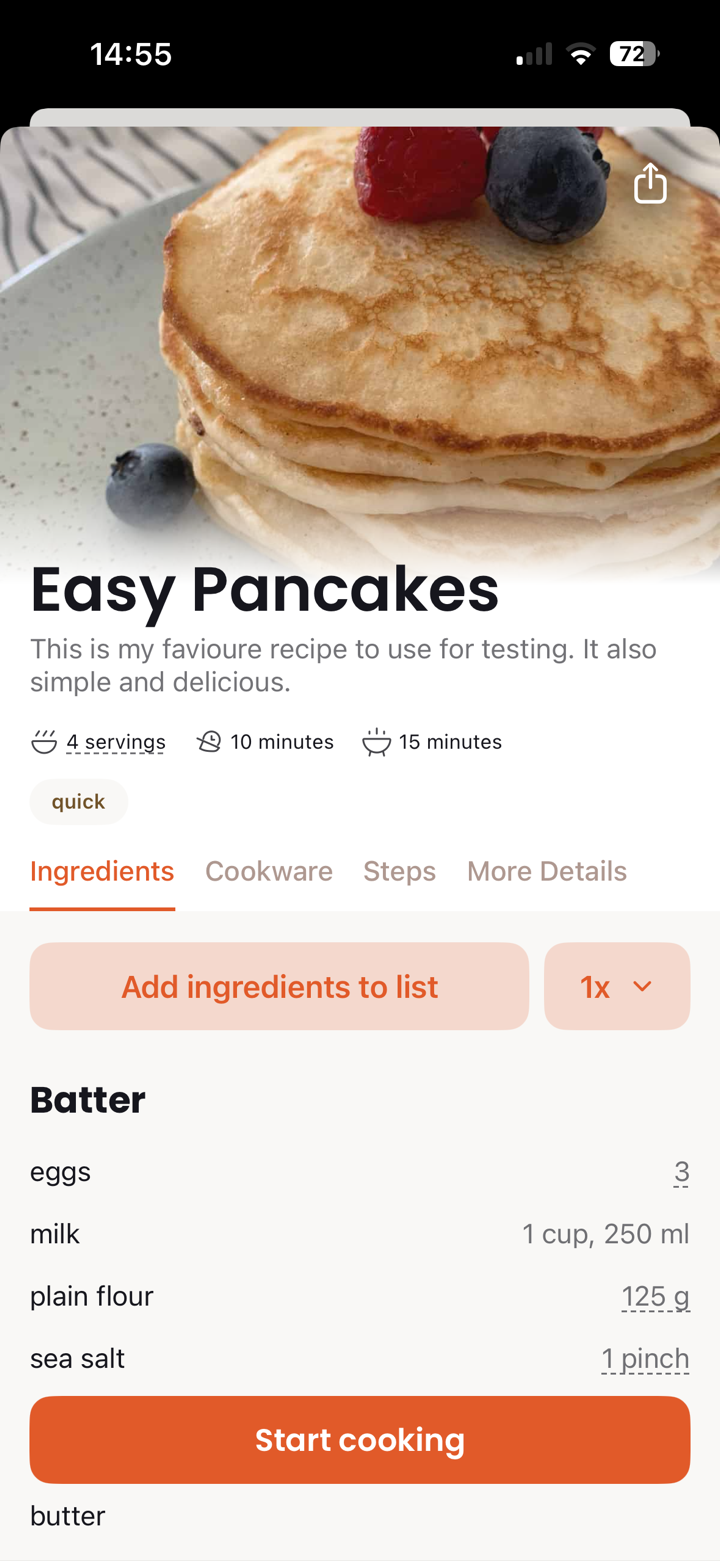
Recipe Information
The recipe view displays:
- Recipe name at the top
- Metadata like servings, prep time, cook time, author
- Ingredients with quantities and units
- Cookware needed for the recipe
- Steps with clear instructions
Adding to Shopping List
From the recipe view, tap the shopping cart button to add all ingredients to your shopping list. You can adjust quantities before adding.

Starting Cooking Mode
Tap Start Cooking to enter the step-by-step cooking mode.
Metadata & Images
The app displays rich recipe metadata with intuitive icons, giving you all the key information at a glance.
Supported Metadata
Recipe metadata is defined using YAML frontmatter at the beginning of your .cook file. The following fields are displayed with icons when present:
---
servings: 4
time: 45 minutes
prep time: 15 minutes
cook time: 30 minutes
difficulty: easy
cuisine: Italian
course: dinner
diet: vegetarian
author: Chef John
---| Metadata | Example Value | Display |
|---|---|---|
| servings | 4 |
4 servings |
| time | 45 minutes |
45 minutes |
| prep time | 15 minutes |
15 min prep |
| cook time | 30 minutes |
30 min cook |
| difficulty | easy |
Easy, Medium, Hard |
| cuisine | Italian |
Italian, Mexican, etc. |
| course | dinner |
Breakfast, Lunch, Dinner |
| diet | vegetarian |
Vegetarian, Vegan, etc. |
| author | Chef John |
Chef John |
Recipe Images
Add a beautiful header image to your recipe. The image displays prominently at the top of the recipe detail view.
Automatic Detection
Add images to your recipe by including a supported image file (.png, .jpg) matching the name of the recipe in the same directory:
Baked Potato.cook
Baked Potato.jpg
Step Images
You can also add images for specific steps by including a step number before the file extension:
Chicken French.cook
Chicken French.0.jpg
Chicken French.3.jpg
Using Metadata
Alternatively, specify the image in the frontmatter. Images can be local files or URLs:
---
image: pasta-carbonara.jpg
---
Or reference an image from the web:
---
image: https://example.com/pasta-carbonara.jpg
---
Image Requirements:
- Place the image file in the same folder as your recipe
- Use common formats: JPG, PNG, or HEIC
- Landscape orientation works best for the header display
Custom Metadata
Any additional fields you add to the frontmatter appear in the "More Details" tab. This is perfect for notes, source URLs, or any custom information.
---
source: https://example.com/recipe
notes: Best served fresh
wine pairing: Chianti
---
Tags
Recipe tags are displayed as colorful chips below the metadata bar. Add tags to categorize and find recipes easily.
---
tags:
  - quick
  - weeknight
  - family-friendly
---
Scaling Recipes
Easily adjust recipe quantities when cooking for more or fewer people. The app automatically recalculates all ingredient amounts.
How to Scale
There are several ways to scale a recipe:
Scale by Multiplier
Tap the scale button to open the scaling picker. Enter a multiplier like 2 (double the recipe) or 0.5 (halve it). All numeric ingredient quantities update instantly.
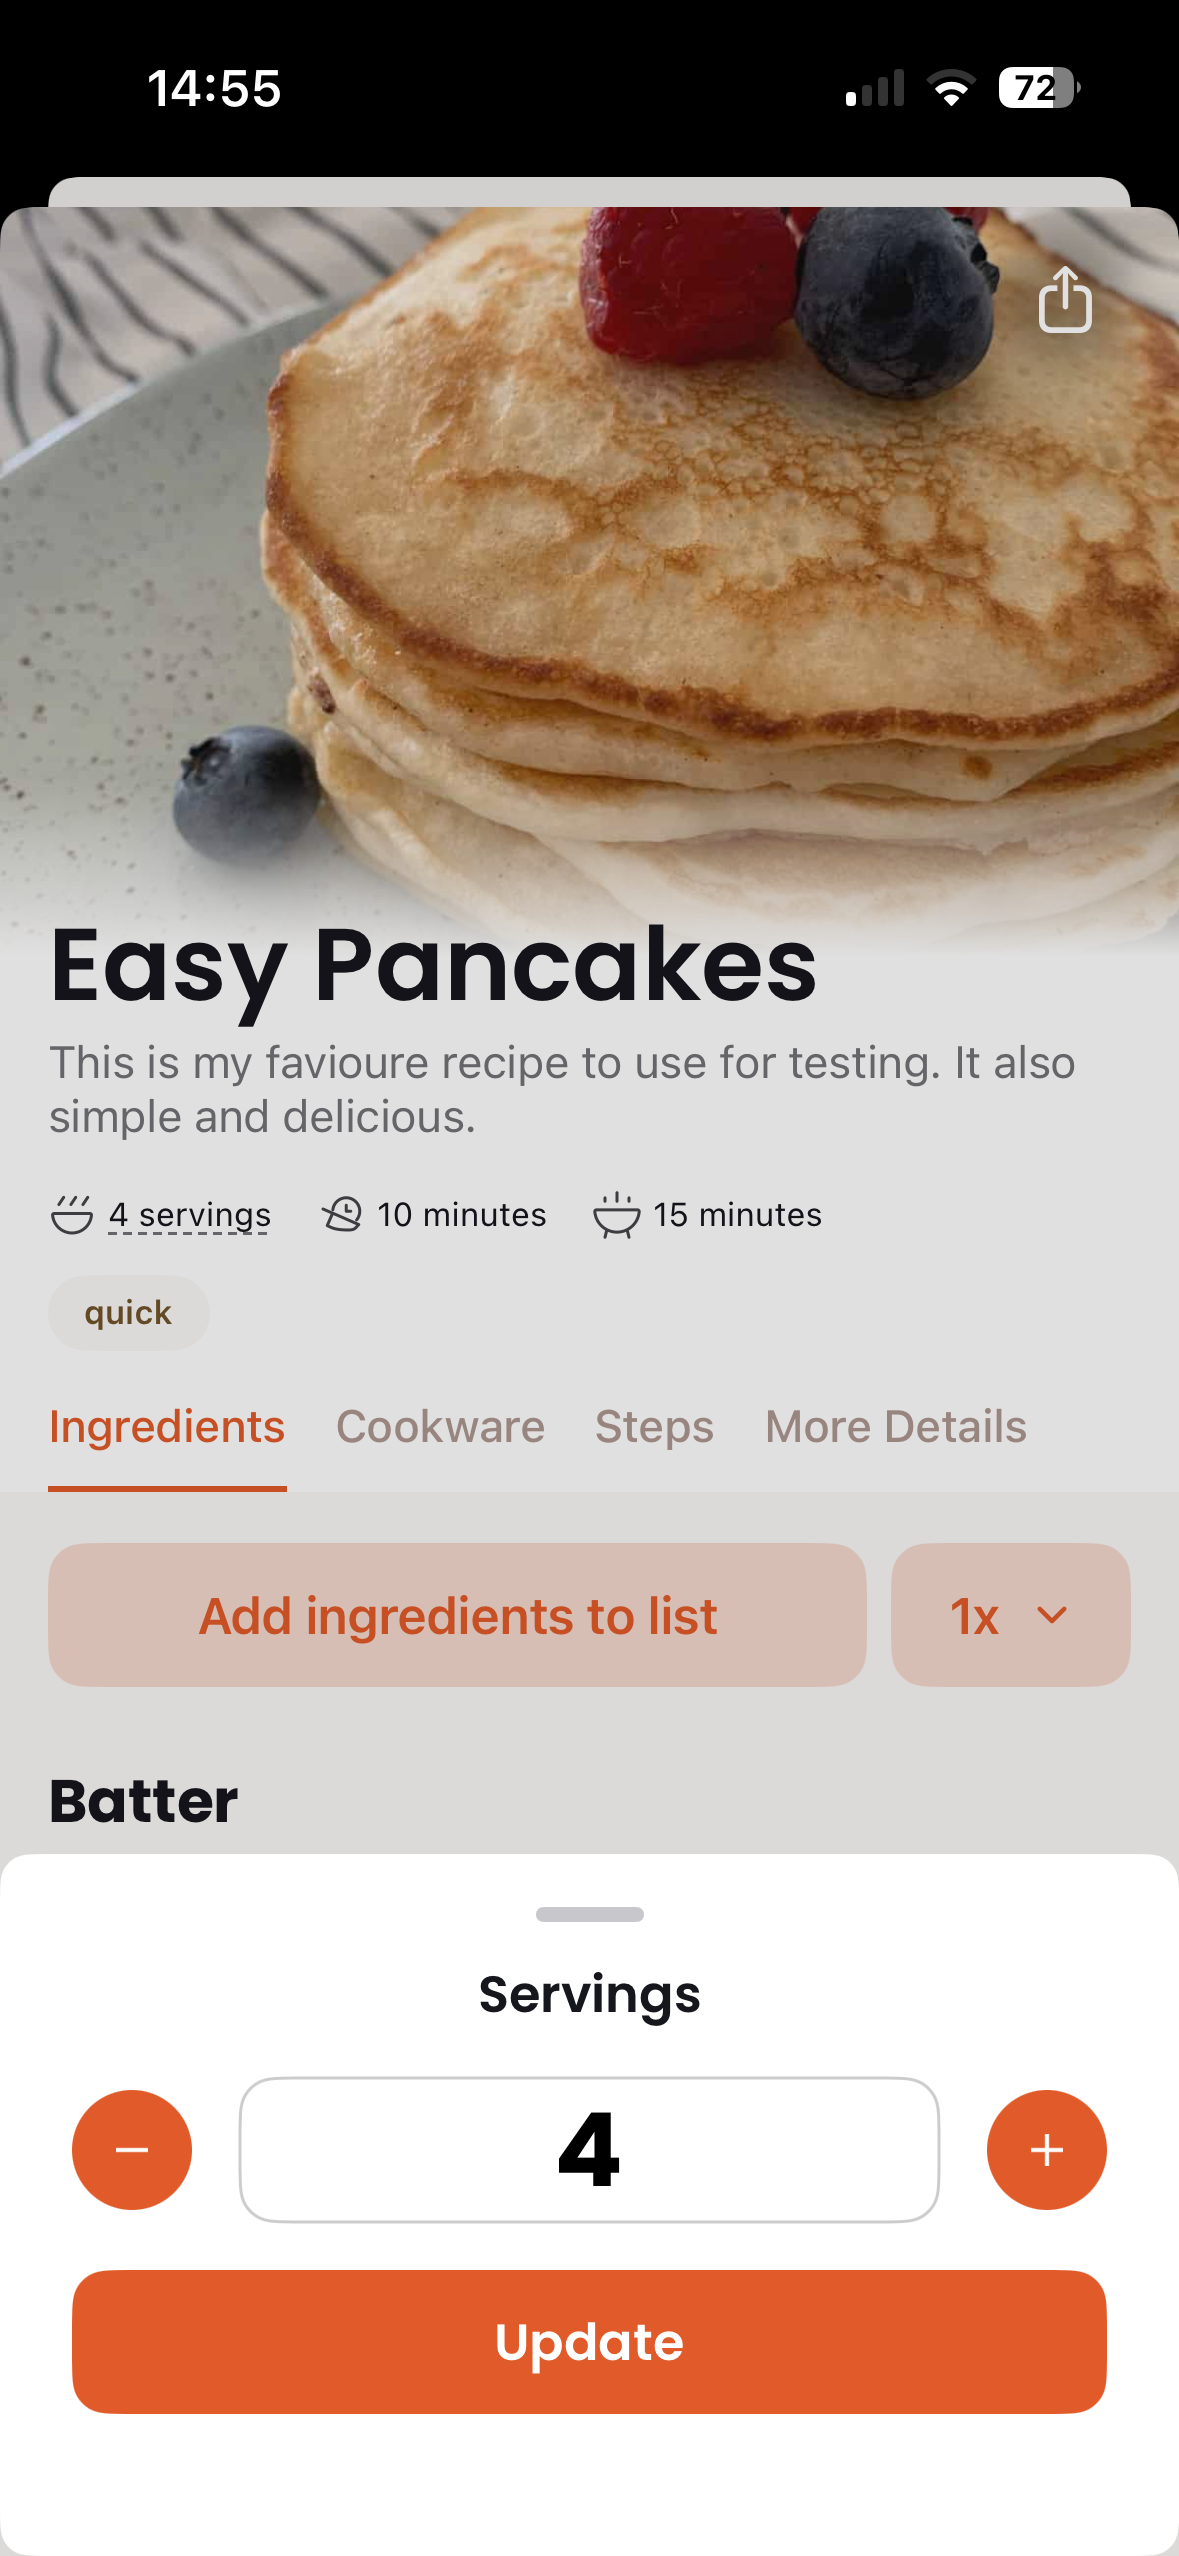


Scale by Servings
If your recipe has servings metadata, you can scale by entering your desired number of servings. The app calculates the appropriate multiplier automatically.
For example, if a recipe serves 4 and you want to serve 6, the app scales all ingredients by 1.5x.
Scale by Ingredient
Have a specific amount of an ingredient you want to use up? Tap on any numeric ingredient quantity to scale the entire recipe based on that ingredient.
For example, if a recipe calls for 200g flour but you have 300g, tap on the flour amount and enter 300. The entire recipe scales proportionally.
What Gets Scaled
- Numeric quantities - All amounts like "200 g" or "2 cups" scale proportionally
- Servings - The servings metadata updates to reflect the scaled amount
- Shopping list - When you add ingredients to the shopping list, they use the scaled quantities
What Doesn't Scale
- Text quantities - Amounts like "a pinch" or "to taste" remain unchanged
- Cooking times - Timer durations stay the same (cooking physics don't scale linearly)
- Instructions - Step text remains unchanged
Note: While ingredient quantities scale mathematically, cooking times may need adjustment for larger batches. A doubled cake batter may need slightly longer baking time.
Scale Indicator
When a recipe is scaled, you'll see the current scale factor displayed (e.g., "2x" or "1.5x"). This helps you remember the recipe has been adjusted.
Resetting Scale
To return to original quantities, open the scale picker and set the value back to 1. Alternatively, close and reopen the recipe to reset.
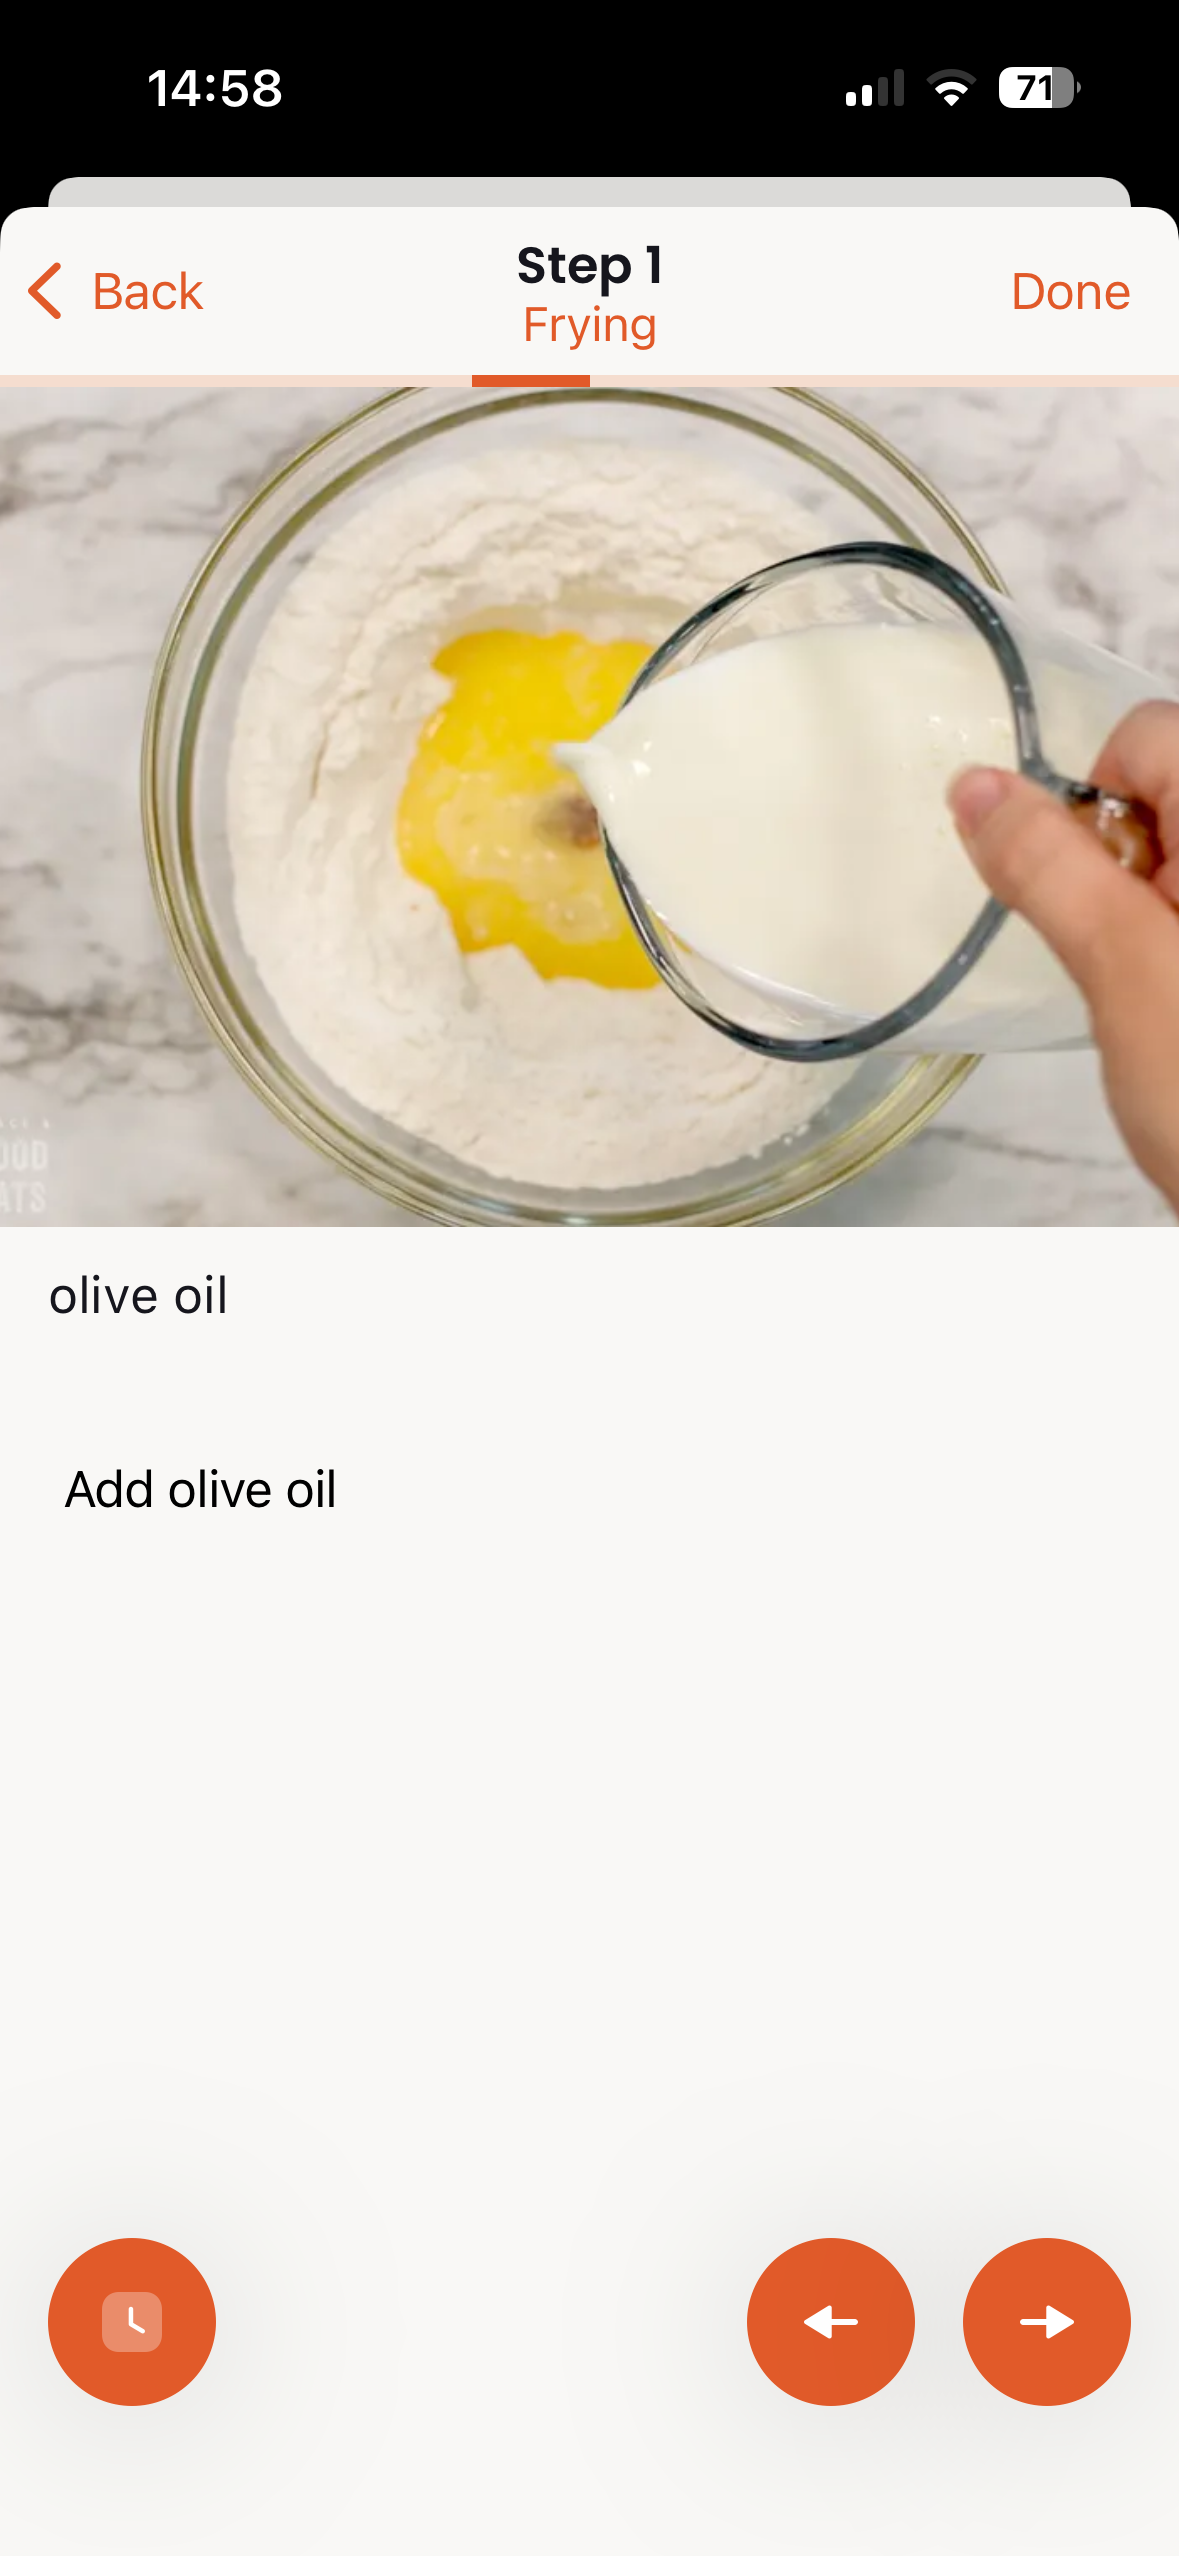
Cooking Mode
Cooking mode displays one step at a time in large, easy-to-read text. Perfect for following along while you cook.
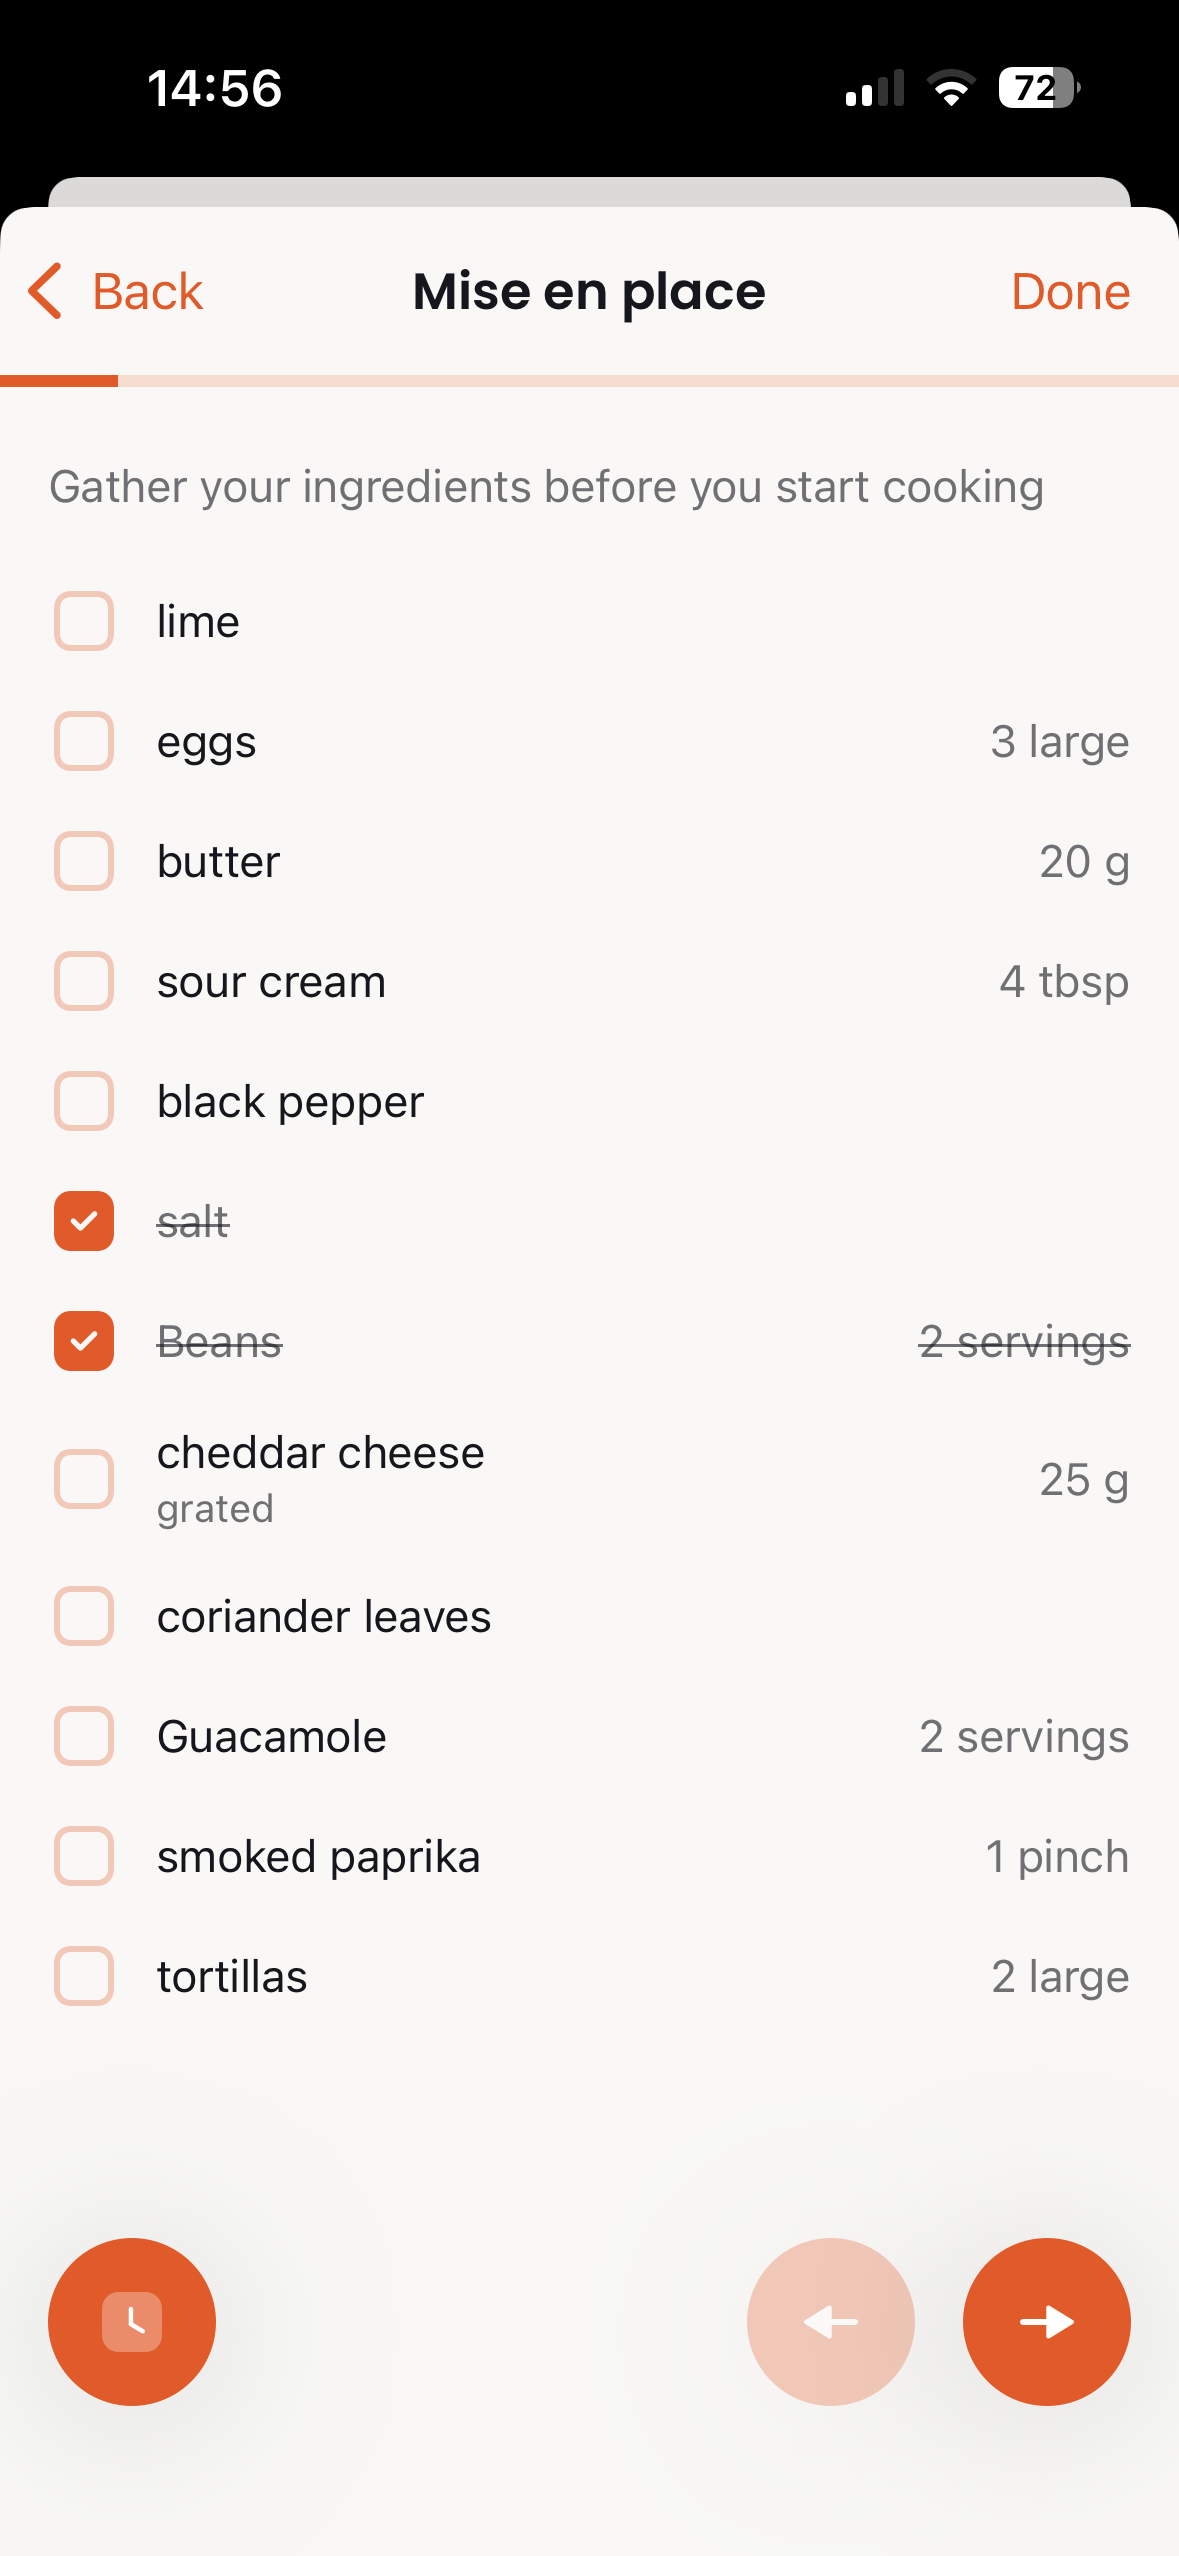
Mise en Place
Before you start cooking, the app shows a mise en place checklist - all the ingredients you need to gather. Check off each item as you prepare it, so you know everything is ready before you begin.
Navigation
- Swipe left to go to the next step
- Swipe right to go back to the previous step
- Tap the step indicator at the bottom to jump to any step
Step Details
Each step shows the instruction text along with any relevant ingredients and their quantities. Timers in the step can be started with a single tap.
Keeping Screen On
While in cooking mode, the screen stays on so you don't lose your place. The app prevents your device from going to sleep.
Exiting Cooking Mode
Tap the X button in the top corner to exit cooking mode and return to the recipe view.
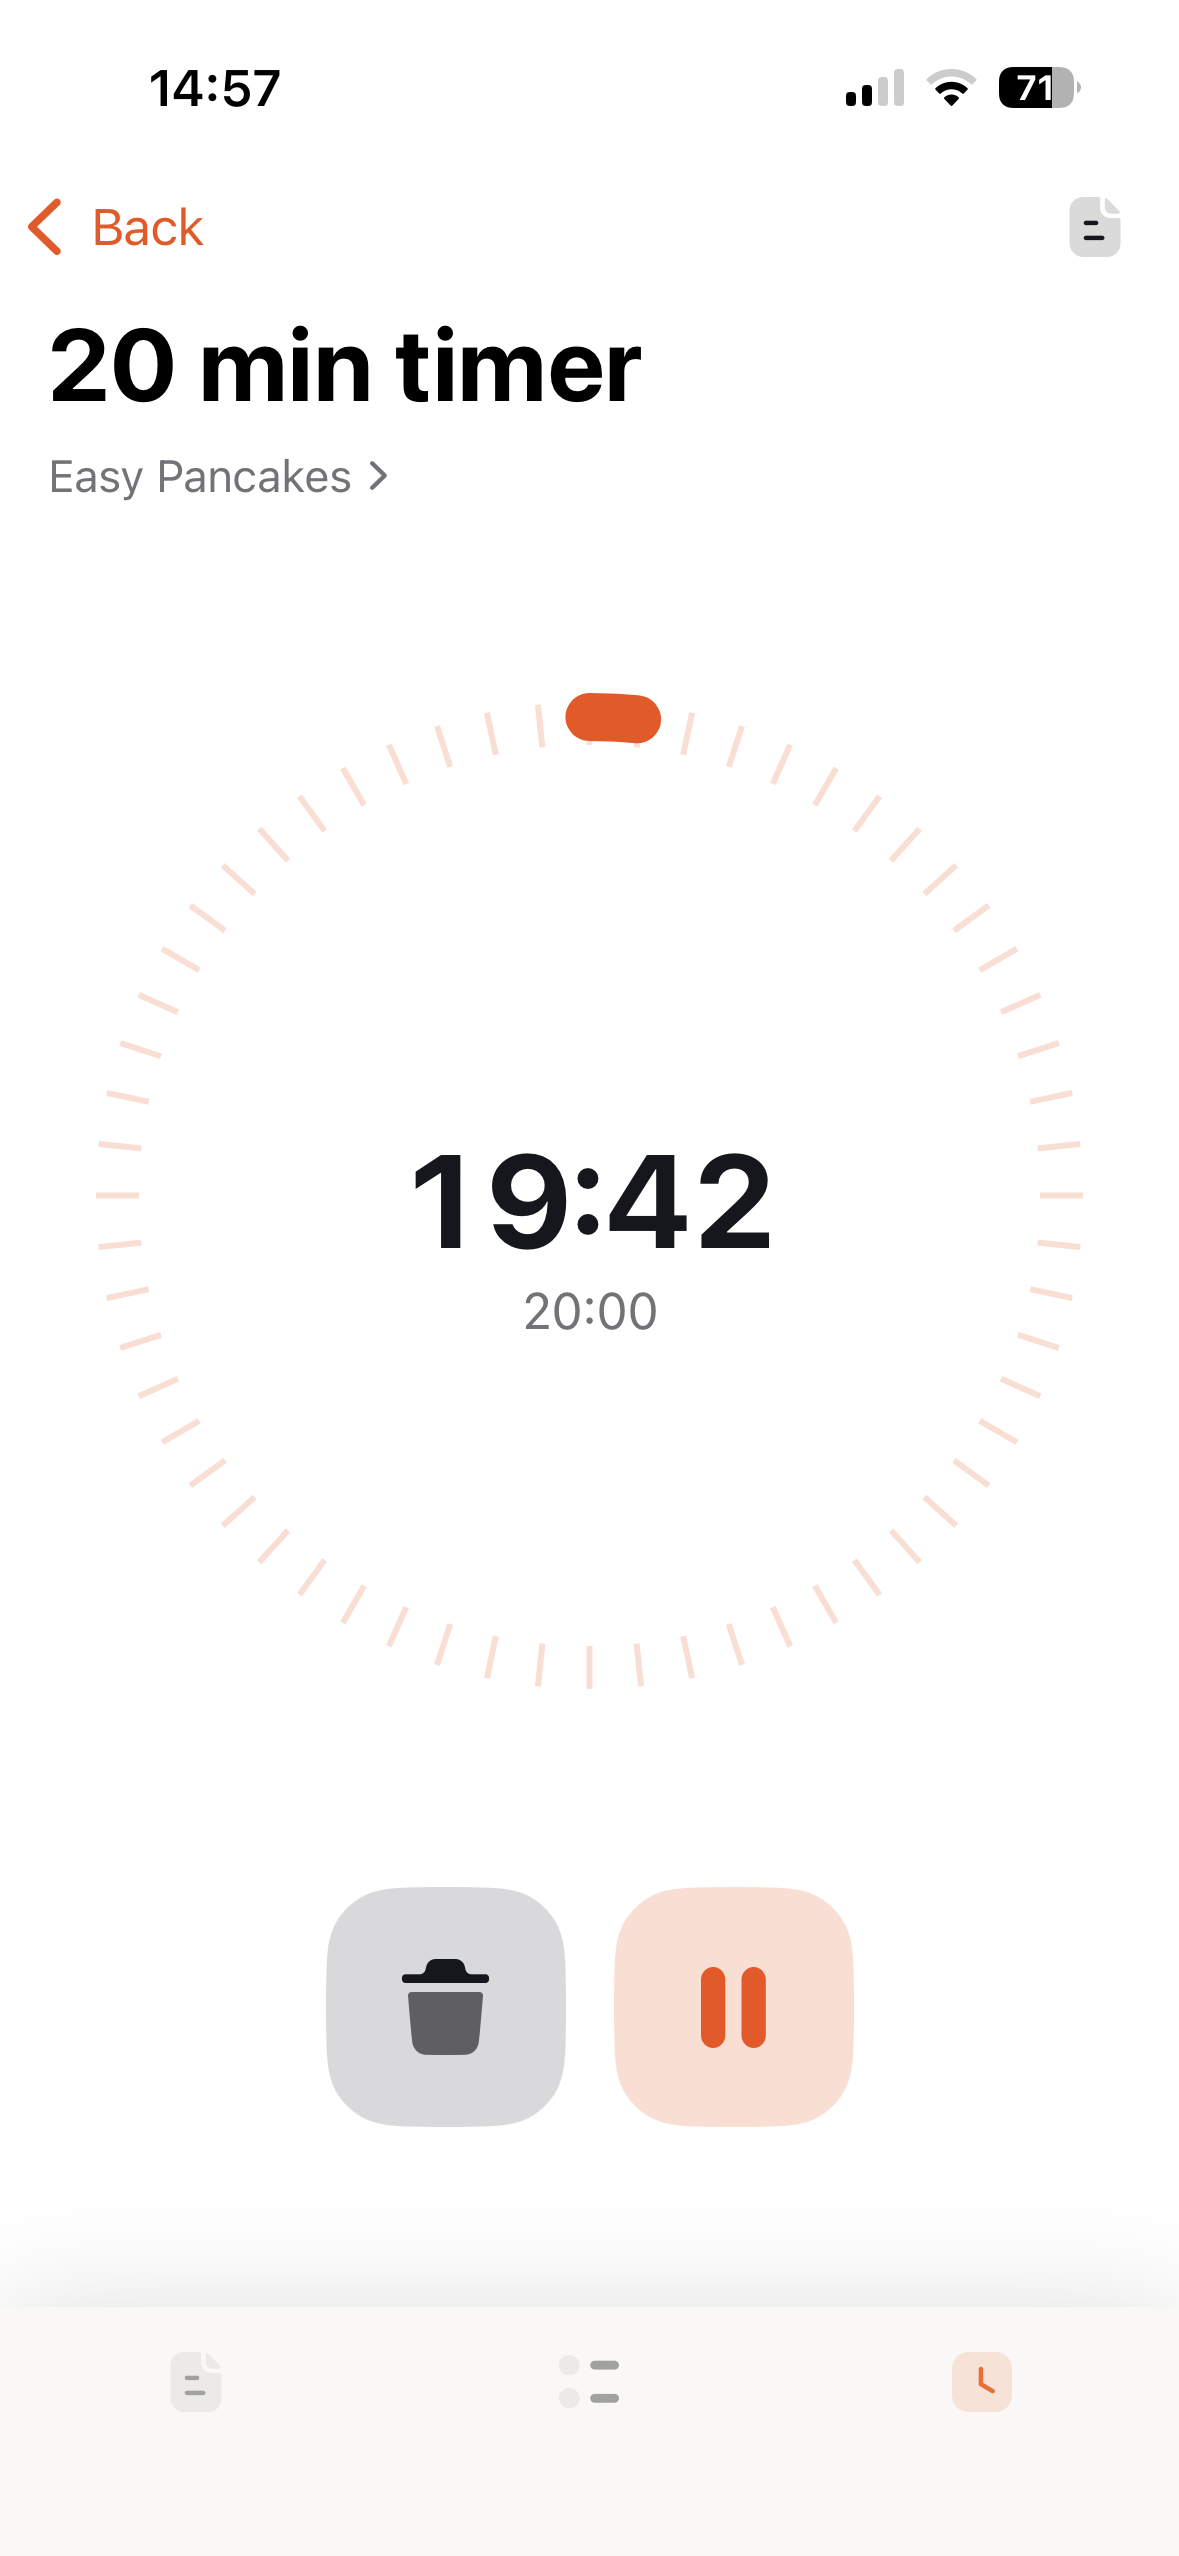
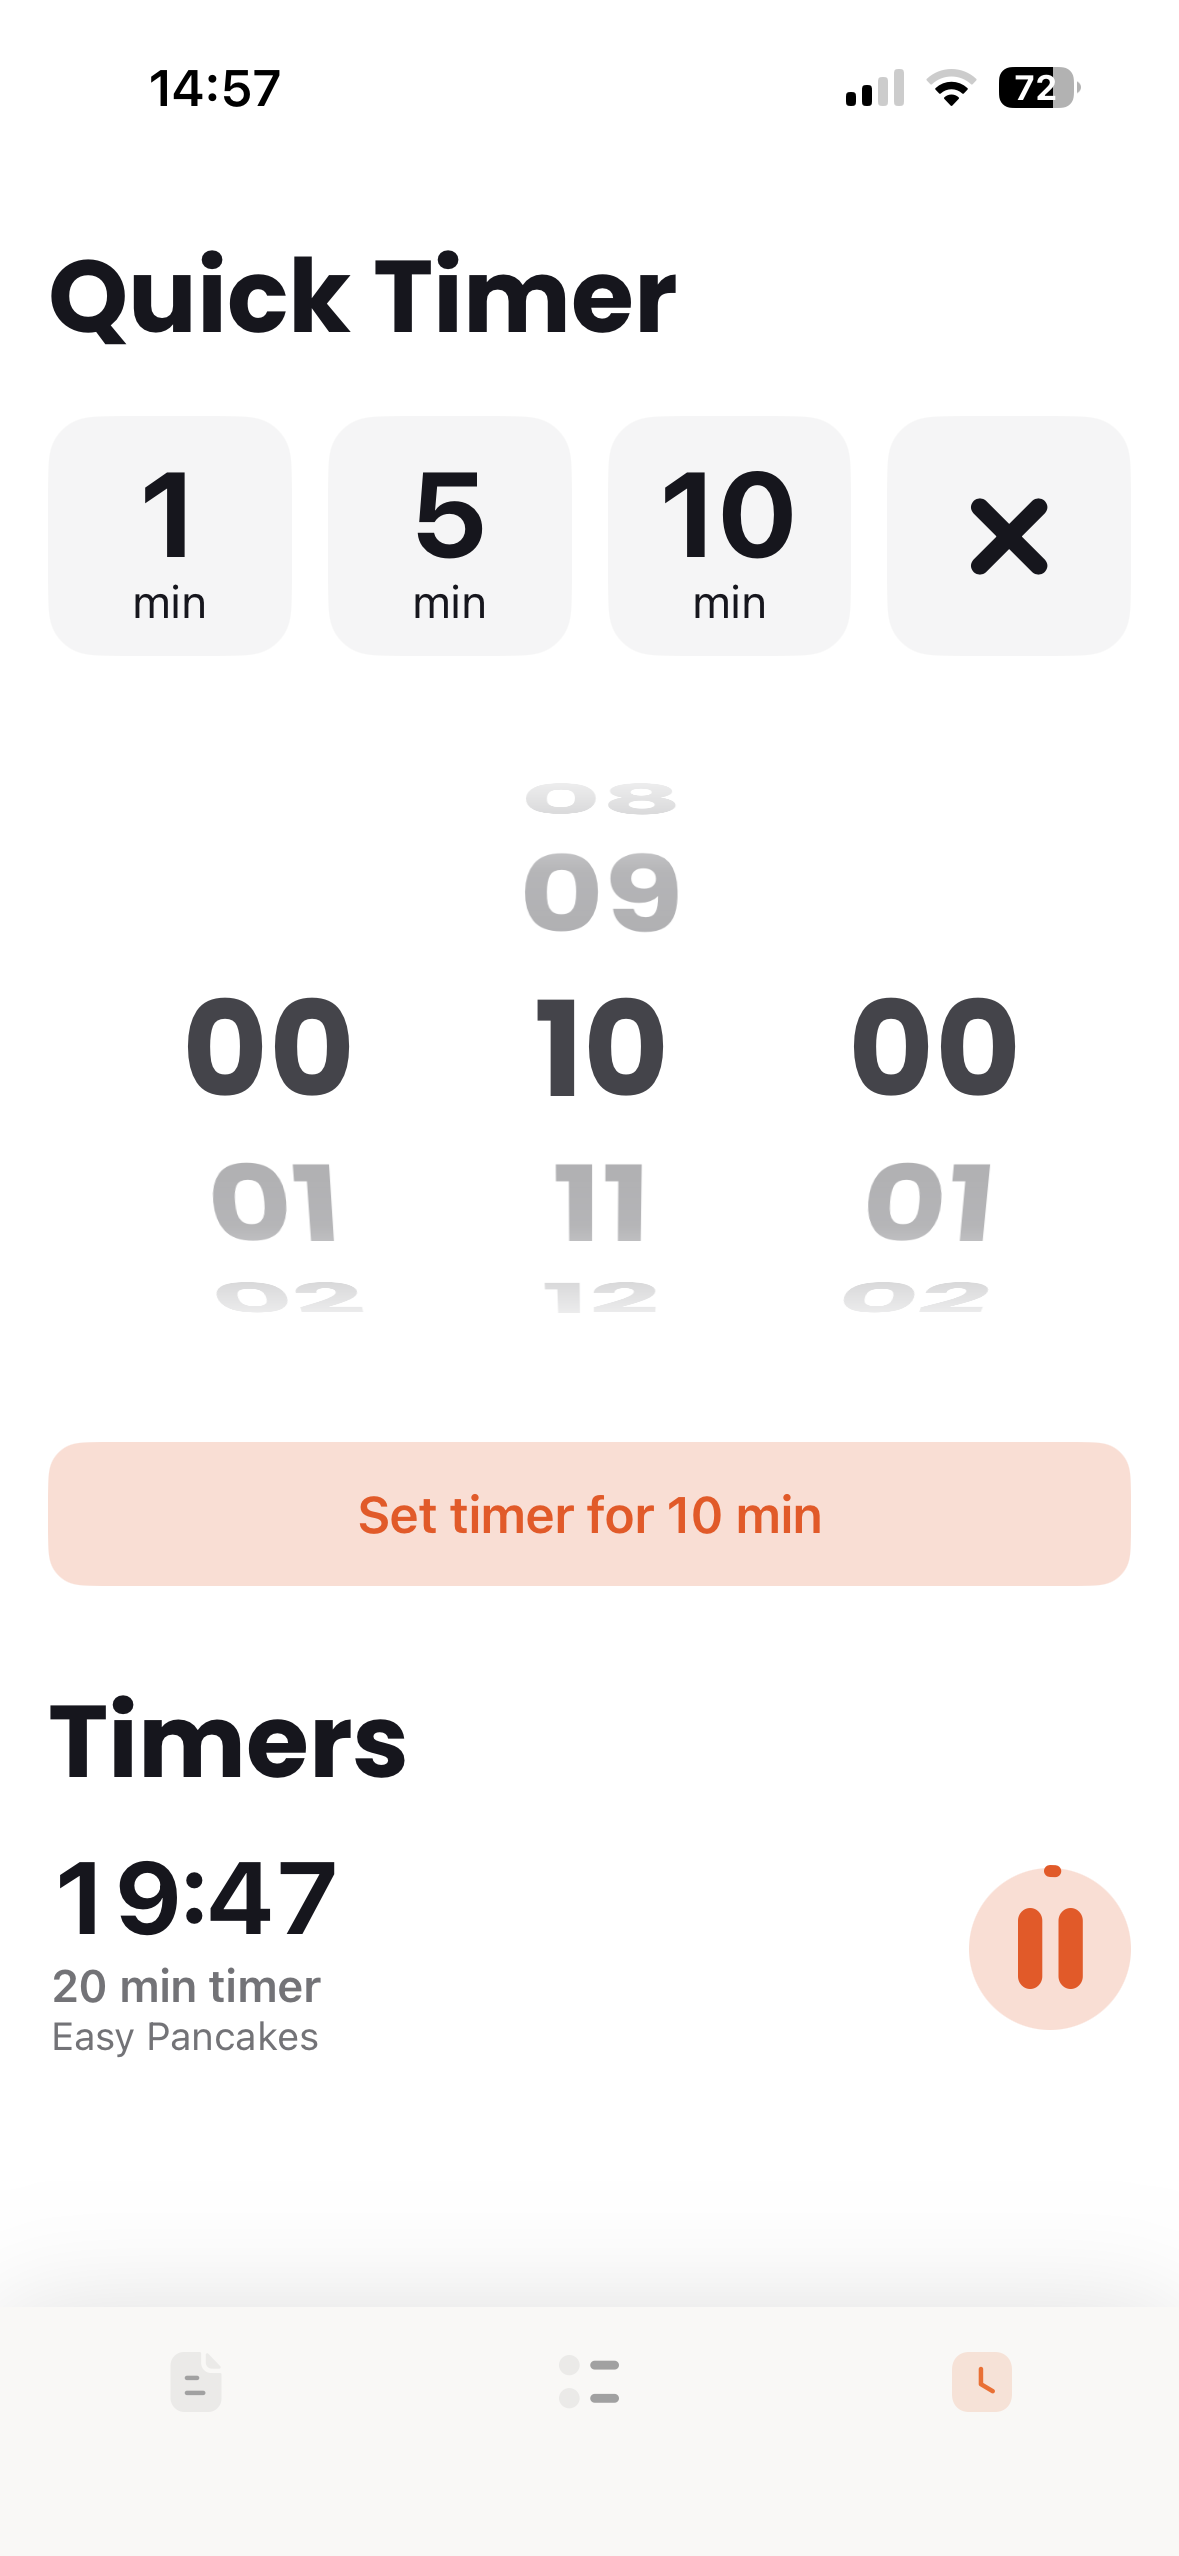
Using Timers
The app includes powerful timer functionality for tracking cooking times.
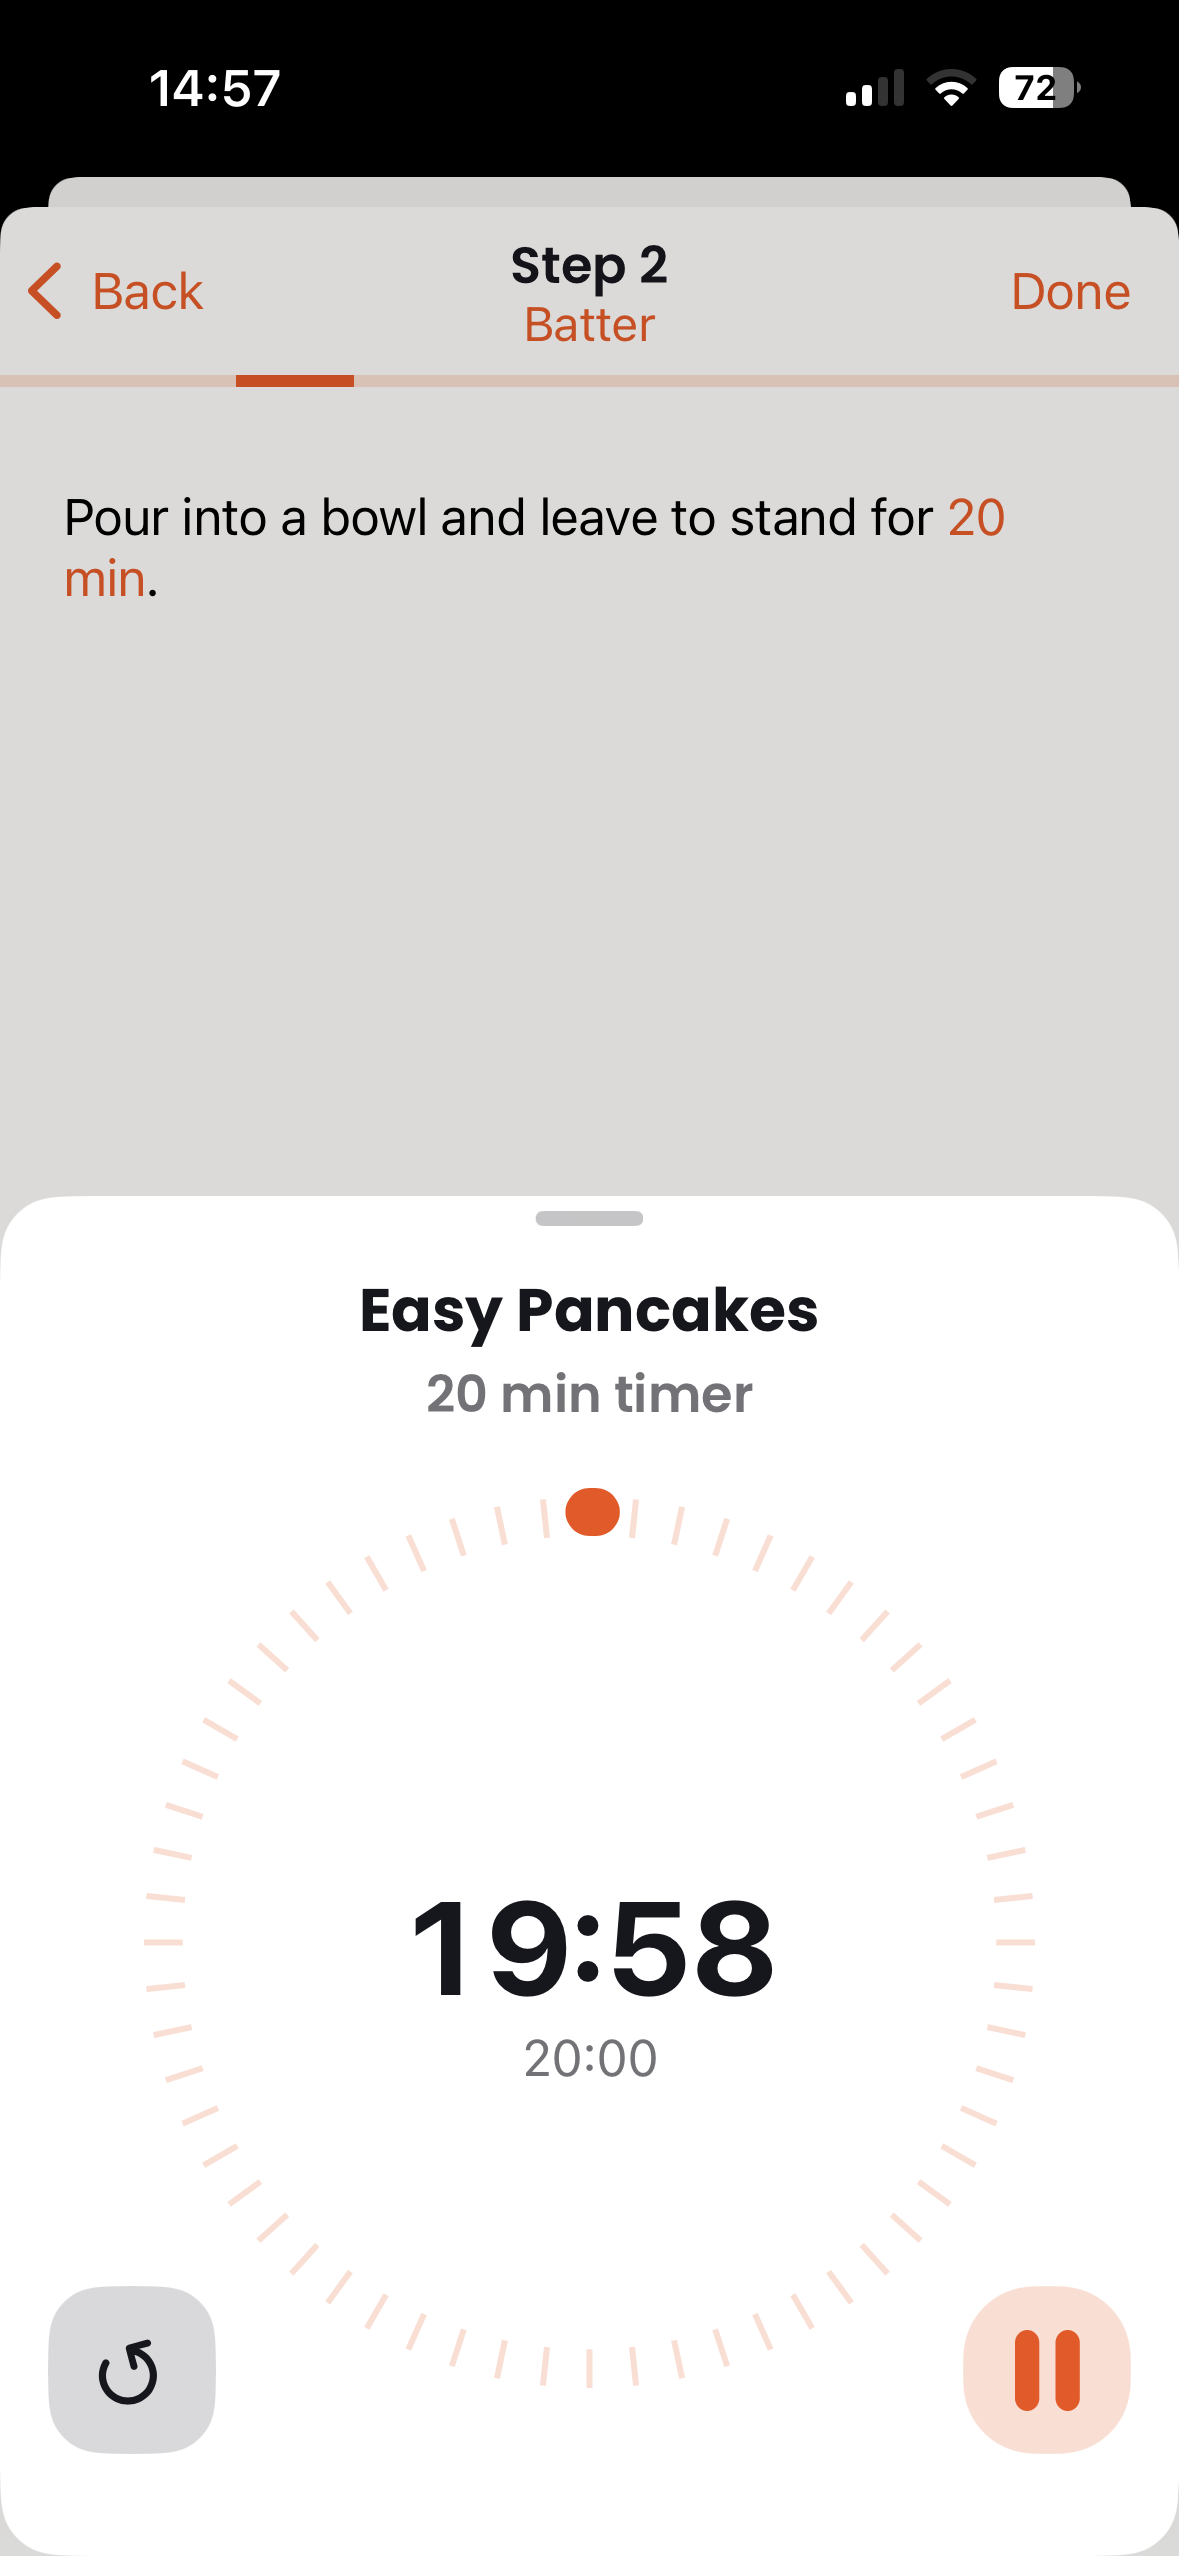
Starting a Timer
Timers can be started in several ways:
- Tap a time mentioned in a cooking step (like "cook for 10 minutes")
- Use the timer button in the recipe view
- Set a custom time manually
Timer Controls
- Play/Pause - Start or pause the timer
- Stop - Cancel the timer
- +1 minute - Add an extra minute
Multiple Timers
You can run multiple timers simultaneously. Each timer runs independently and will notify you when complete.

Notifications
When a timer completes, you'll receive a notification with a sound alert - even if the app is in the background or your device is locked.
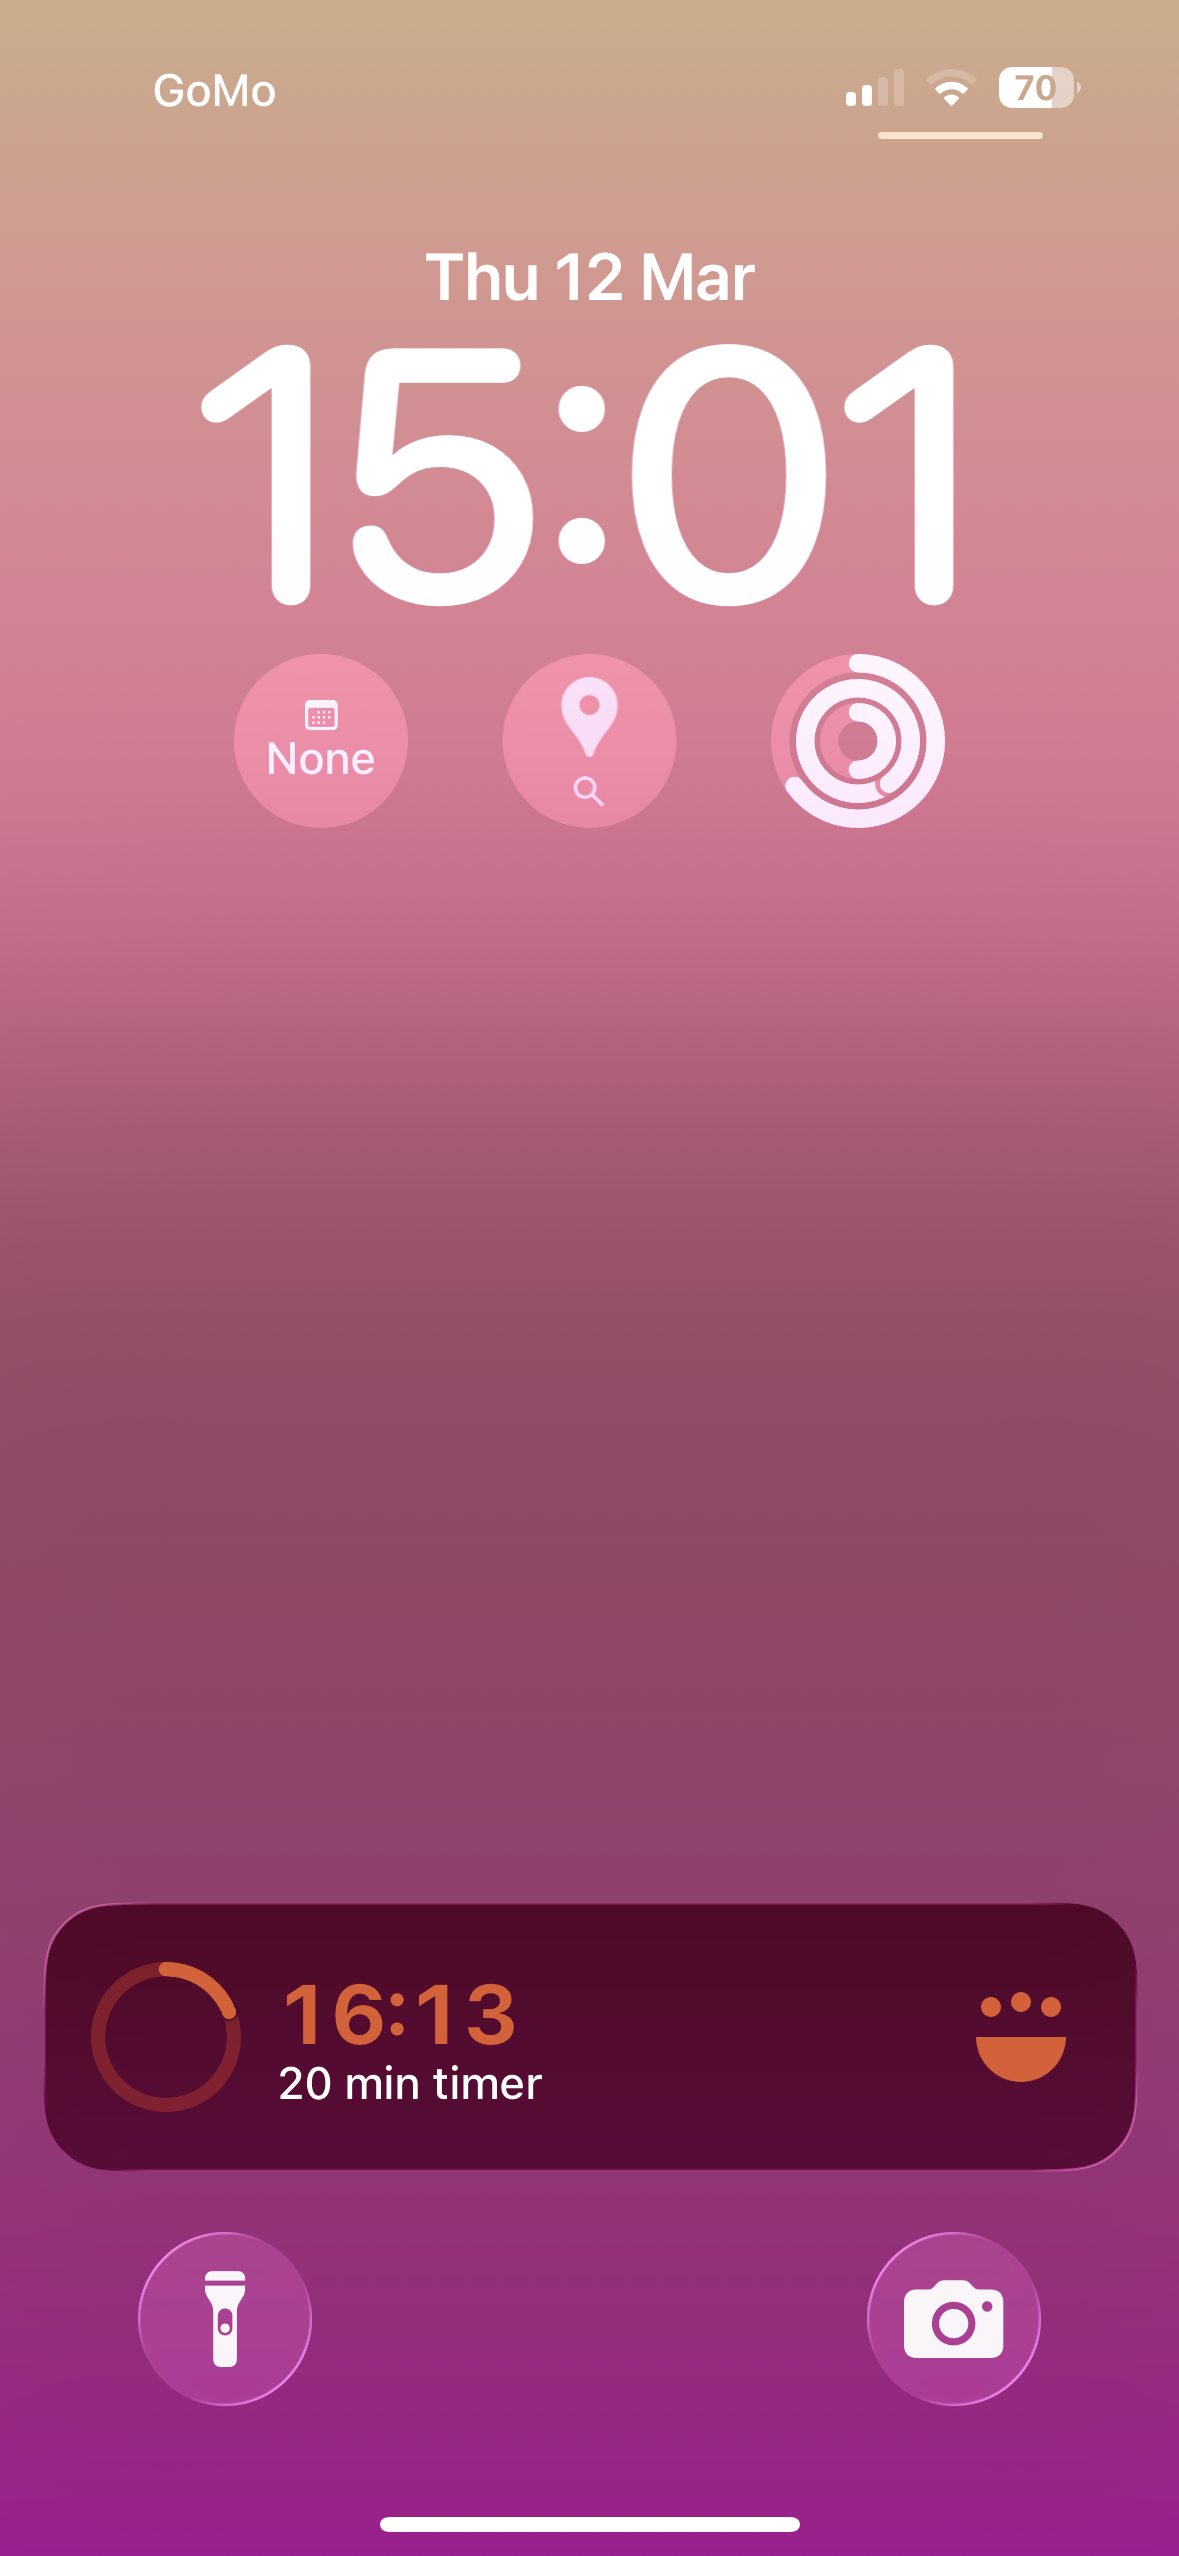
Scenario: You're making a complex dish with pasta boiling, sauce simmering, and bread in the oven - each with different times. Set a timer for each from the recipe steps, and the app tracks them all. You'll get a notification for each one, even if your phone is locked.
Tip: Make sure notifications are enabled for Cook in your device settings to receive timer alerts.
Shopping List
The shopping list helps you buy ingredients for your recipes. View items organized by aisle for efficient store navigation, or switch to the recipe view to see ingredients grouped by recipe.
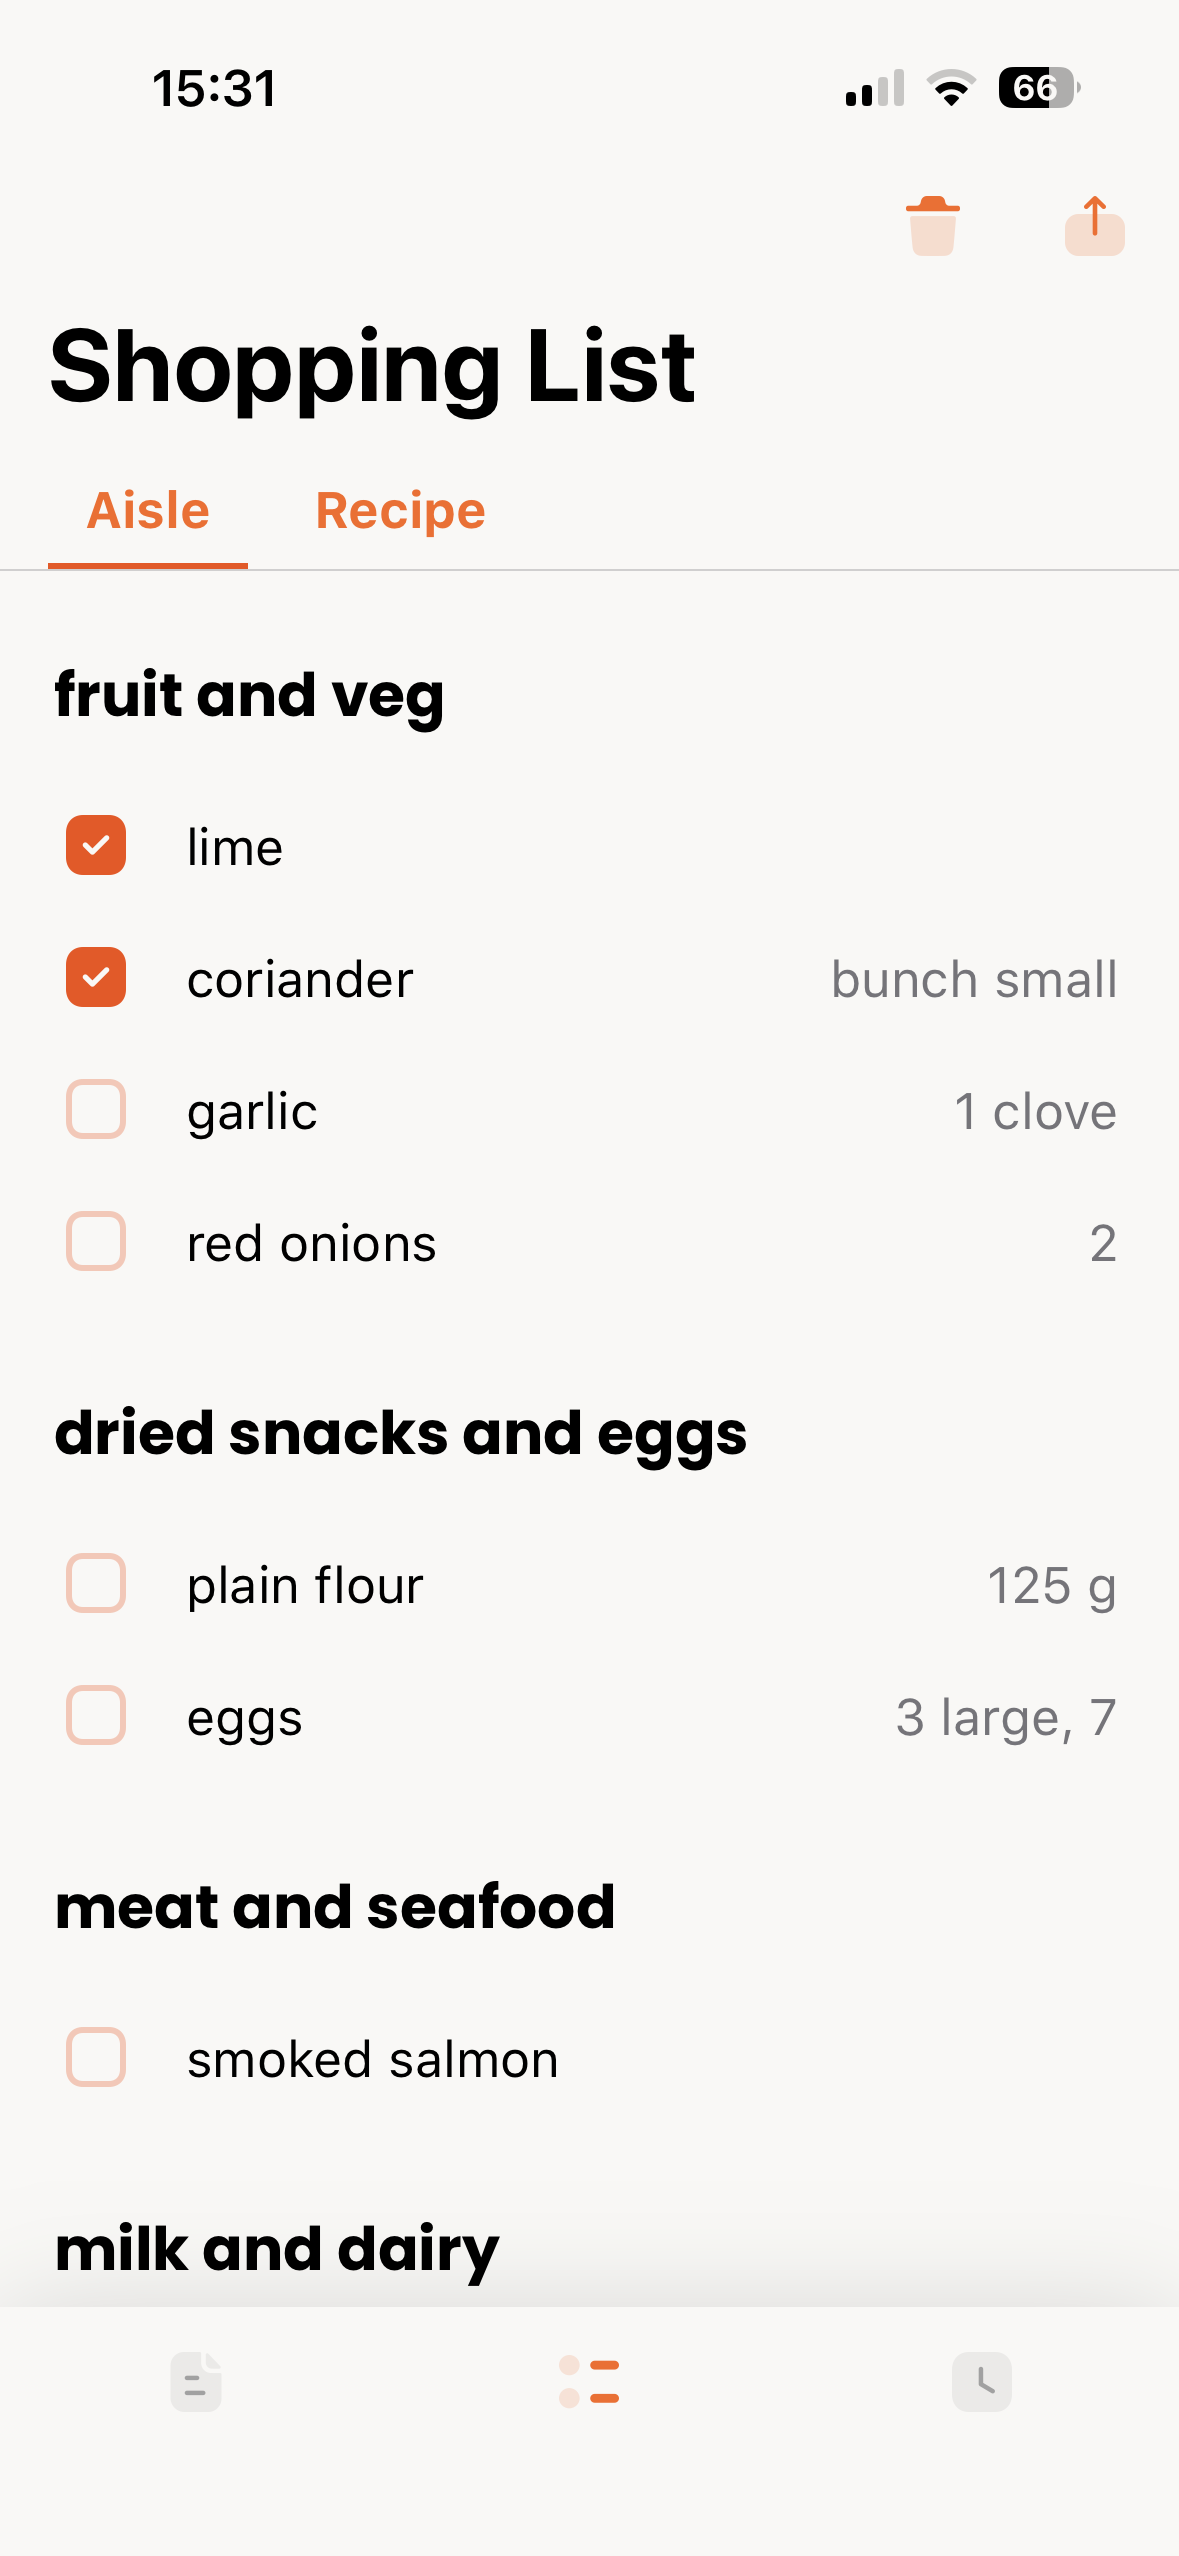
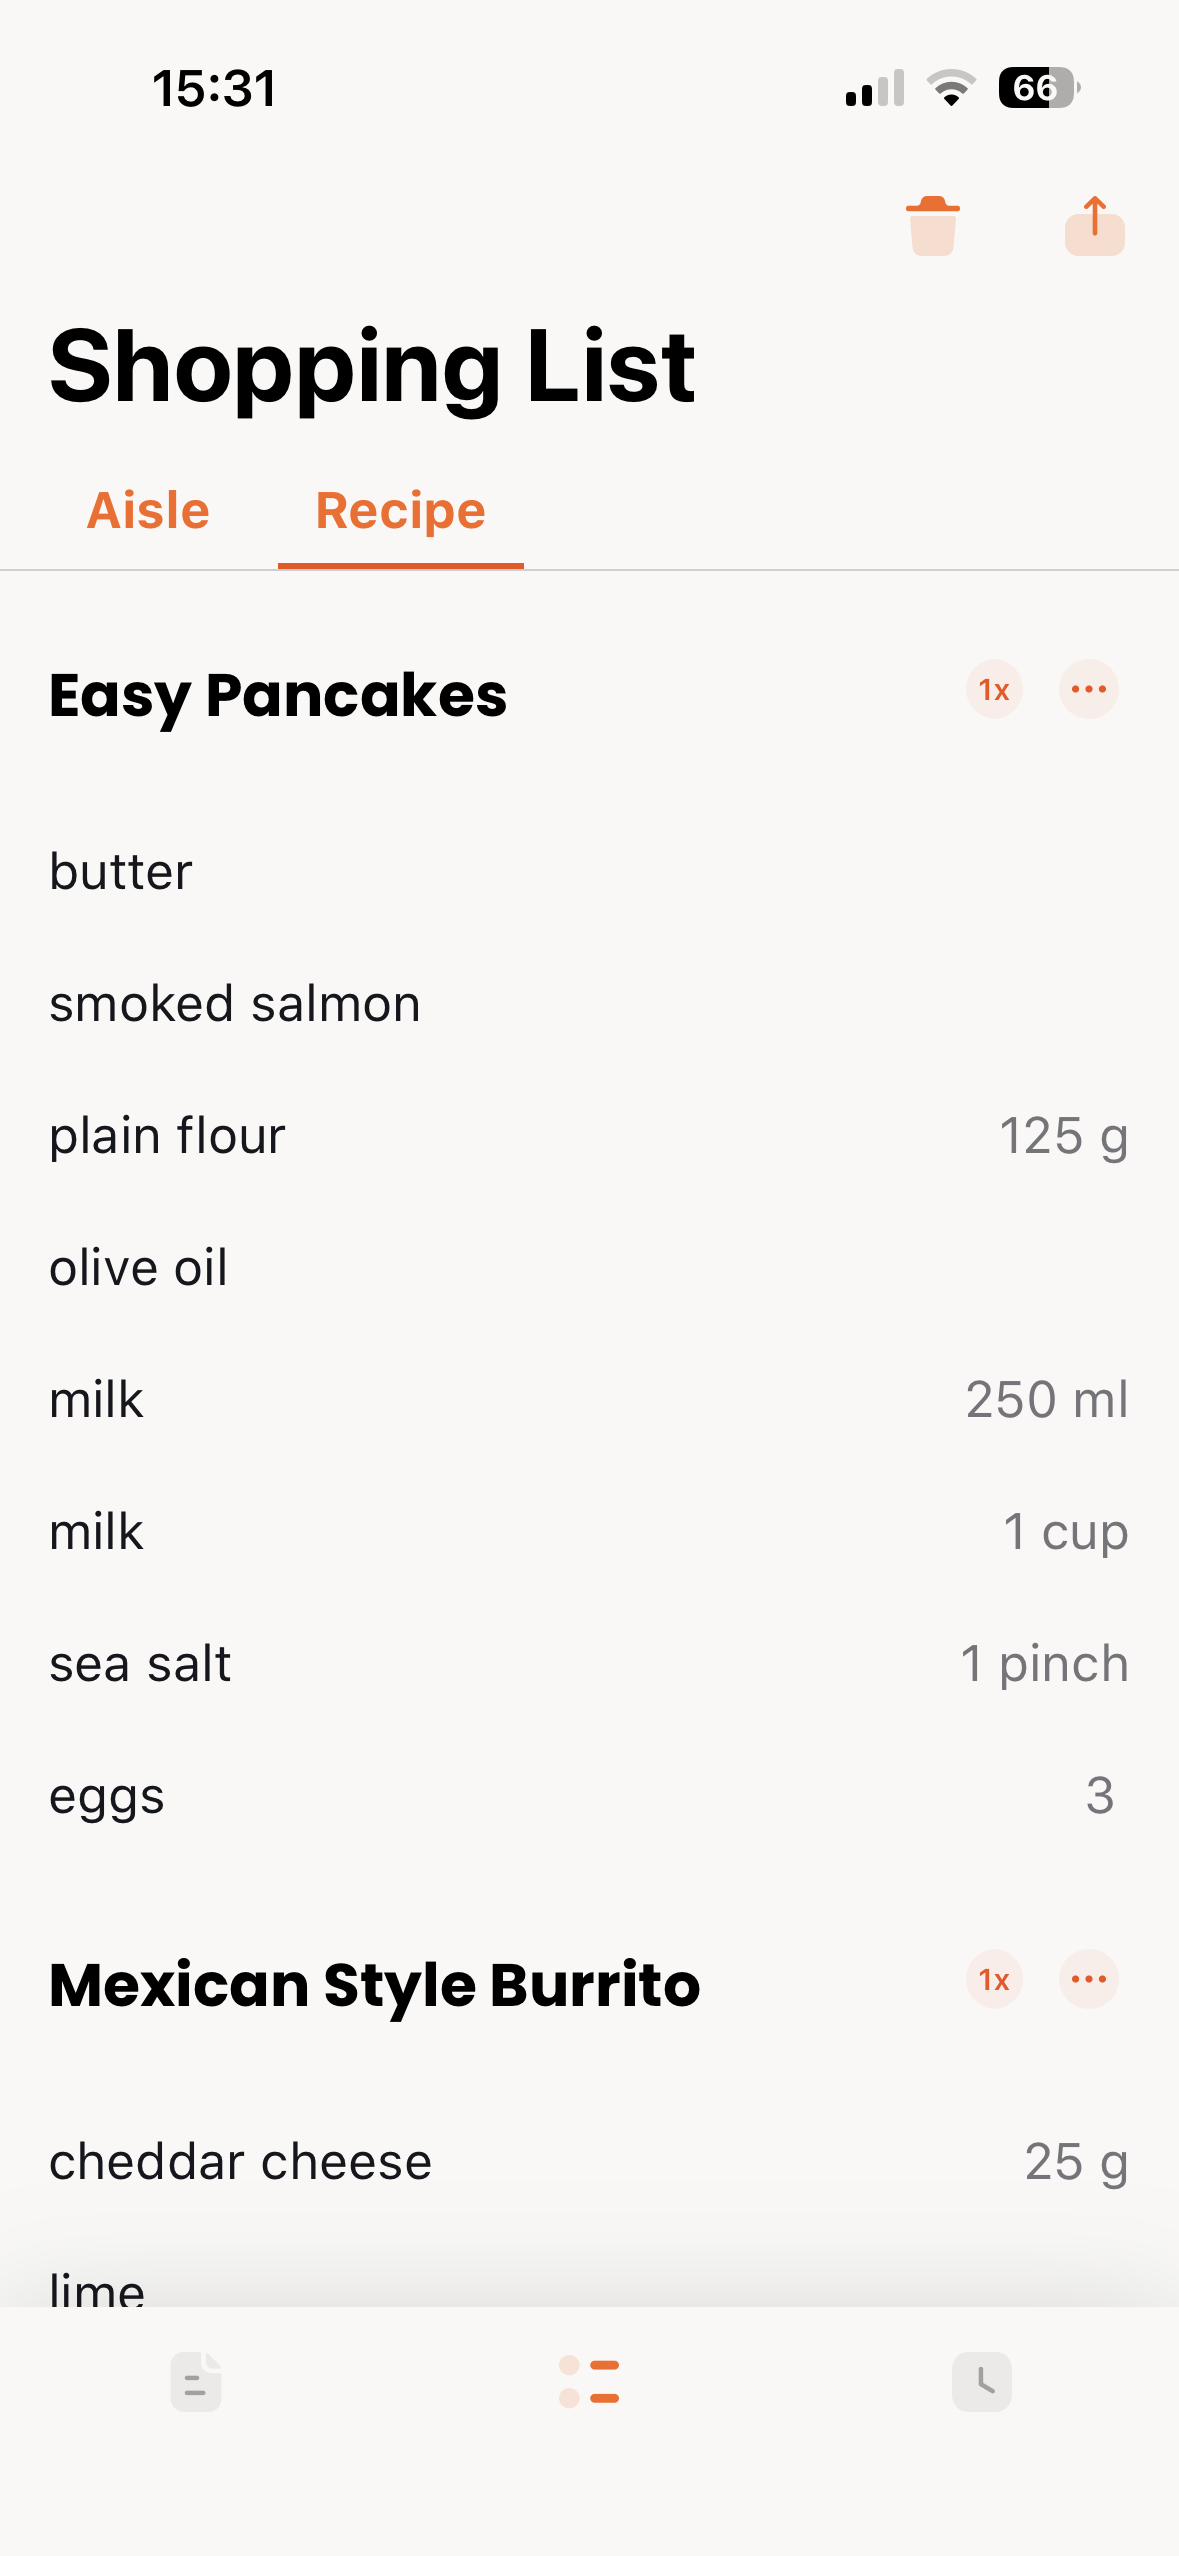
Two Views
Toggle between Aisle and Recipe tabs at the top:
- Aisle view - items grouped by store section (fruit and veg, dairy, meat, etc.) for efficient shopping
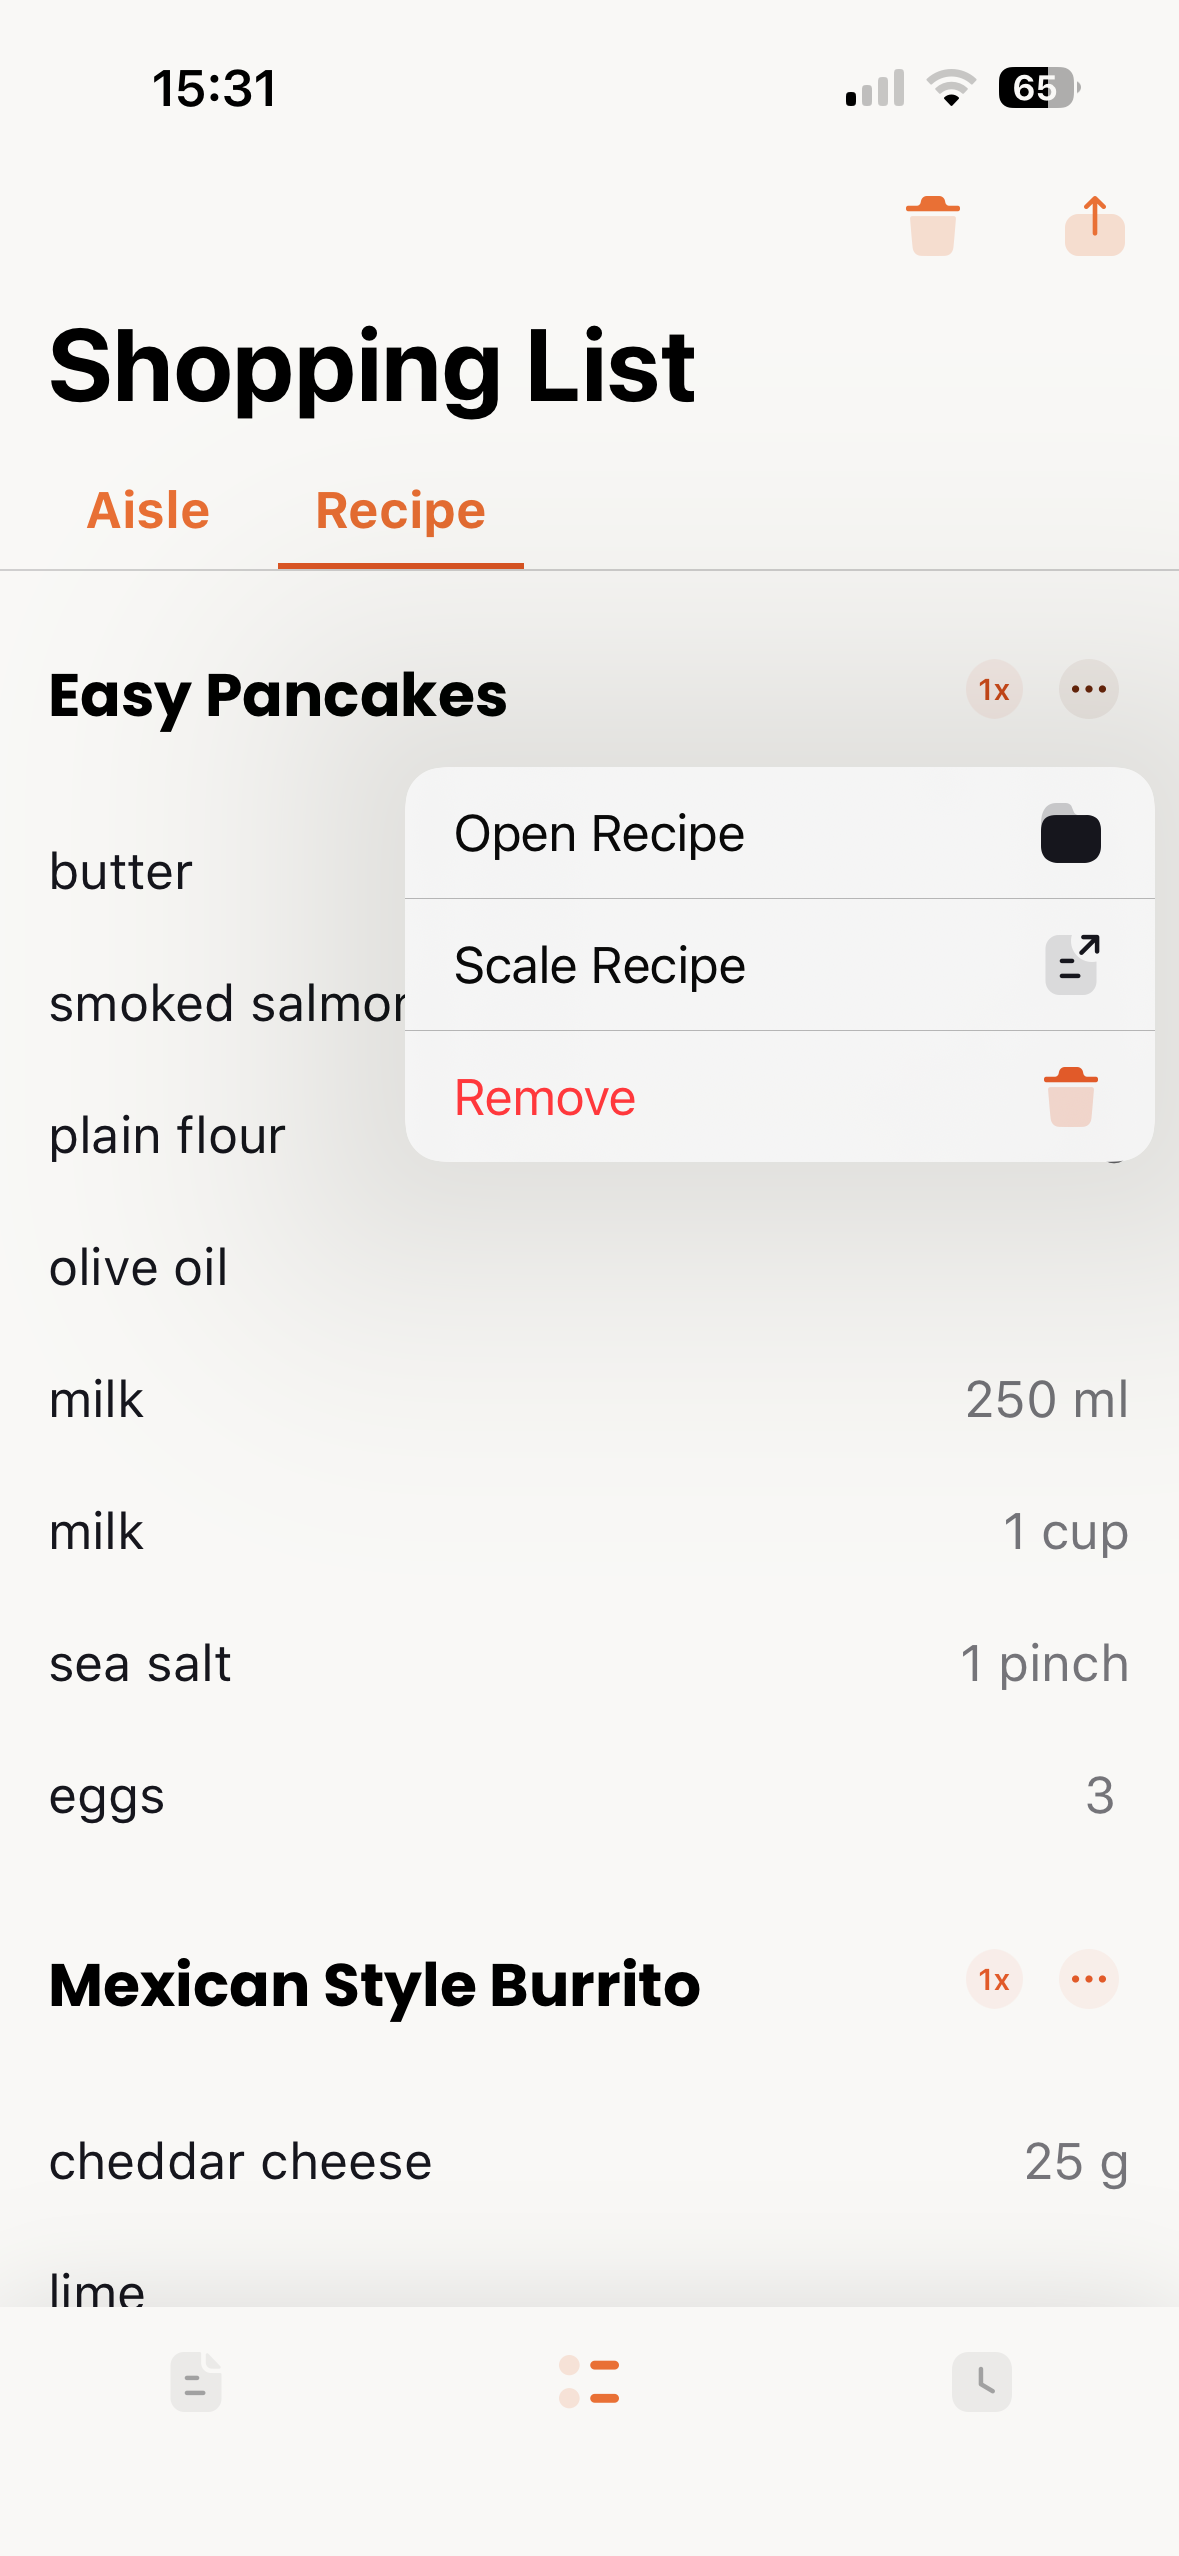
- Recipe view - items grouped by which recipe they came from, with quick actions to open or scale the recipe
Adding Items
Add ingredients to your shopping list from any recipe. You can also add custom items manually.
Scenario: You're planning meals for the week. Open each recipe, scale it to the right number of servings, and tap "Add ingredients to list." The shopping list combines everything you need across all recipes.
Aisle Organization
Items are automatically organized by aisle (fruit and veg, dried snacks and eggs, meat and seafood, milk and dairy, etc.). This makes shopping faster as you move through the store.
Customize aisle groupings by creating a config/aisle.conf file in your recipes folder. Define sections with [section name] and list ingredients below. The shopping list preserves the order of sections as they appear in the file.
[fruit and veg]
lime
garlic
red onions
coriander

[milk and dairy]
whole milk|milk
eggs|egg
cottage cheese
butter

[meat and seafood]
smoked salmon
king prawns

[tinned goods and baking]
plain flour|flour
sugar
yeast

[dried herbs and spices]
sea salt|salt
black pepper
rosemary
thyme

[oils and dressings]
olive oil|oil
soya sauce
Aliases
Use the pipe character (|) to define aliases. The first name is the common name shown in the shopping list; additional names are matched from your recipes. For example, whole milk|milk means any recipe using @milk or @whole milk will appear under "milk and dairy" and display as "whole milk."
Any ingredient not listed in your config will appear in a default "other" section. See the Cooklang shopping documentation for the full configuration format.
Tip: The aisle.conf file syncs with your recipes, so your aisle configuration works across all your devices.
Checking Off Items
Tap an item to check it off as you shop. Checked items move to the bottom of their section.
Deleting Items
Swipe left on an item to reveal the delete button. Tap to remove the item from your list.
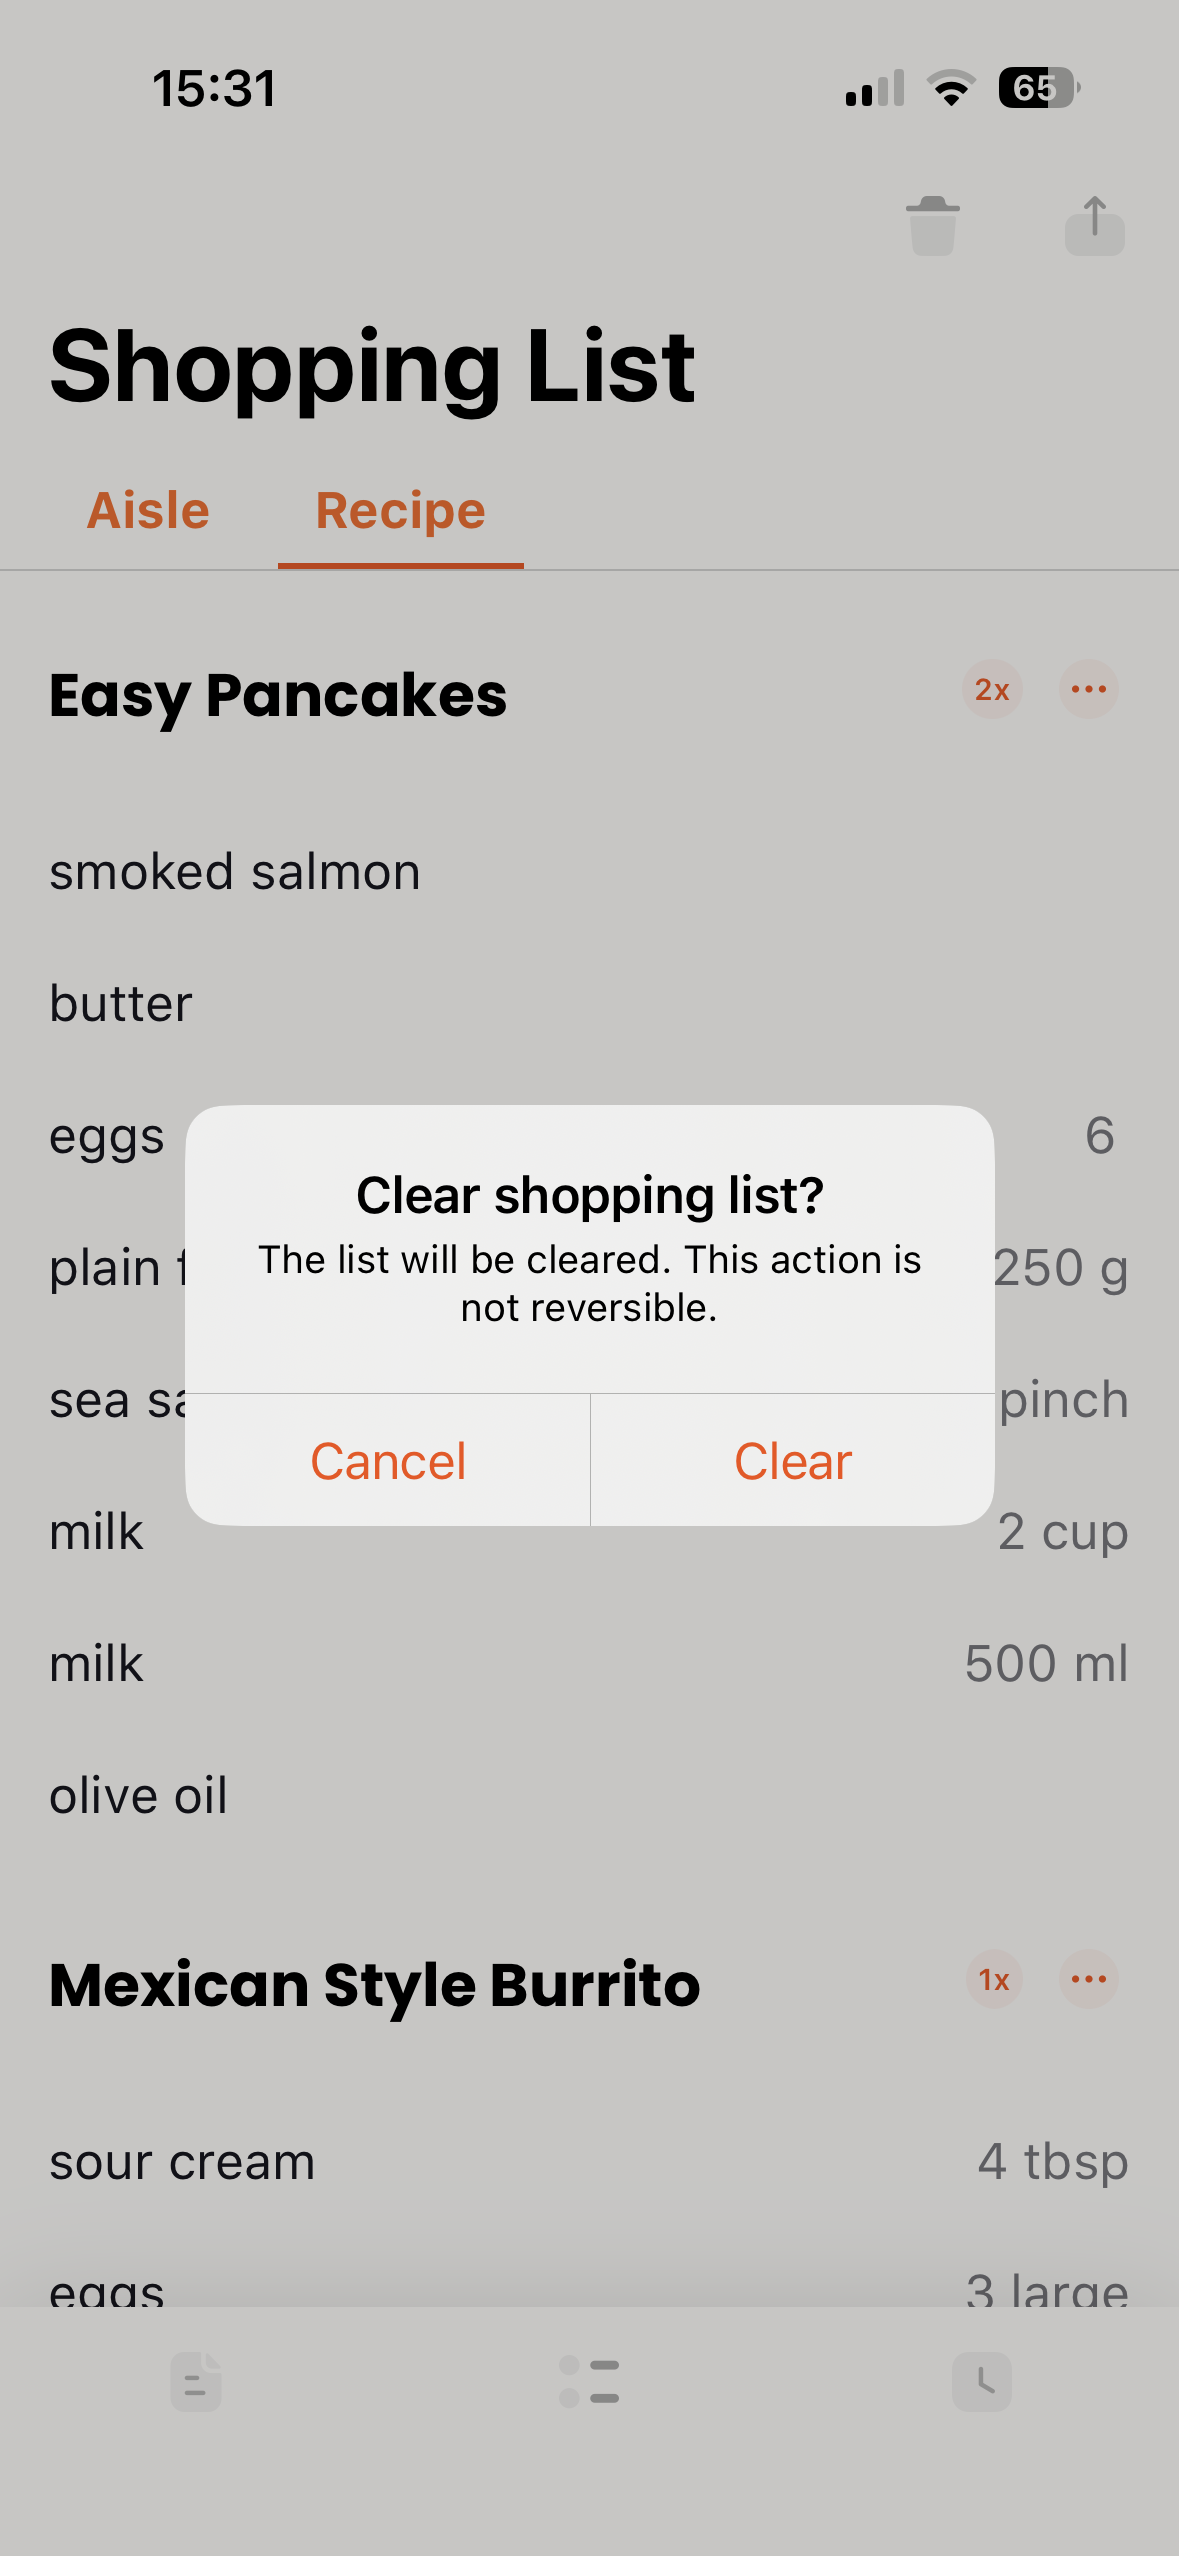
Clearing the List
Use the Clear All button to remove all items at once. You'll be asked to confirm before clearing. This is useful after completing a shopping trip.
Sharing the List
Tap the share button to send your shopping list via Messages, Email, or any other sharing method. Great for coordinating with family members.
Sharing Recipes
Share any recipe with friends and family using a QR code or shareable link. This is great for passing along a recipe at a dinner party or sending it to someone who wants to try it.
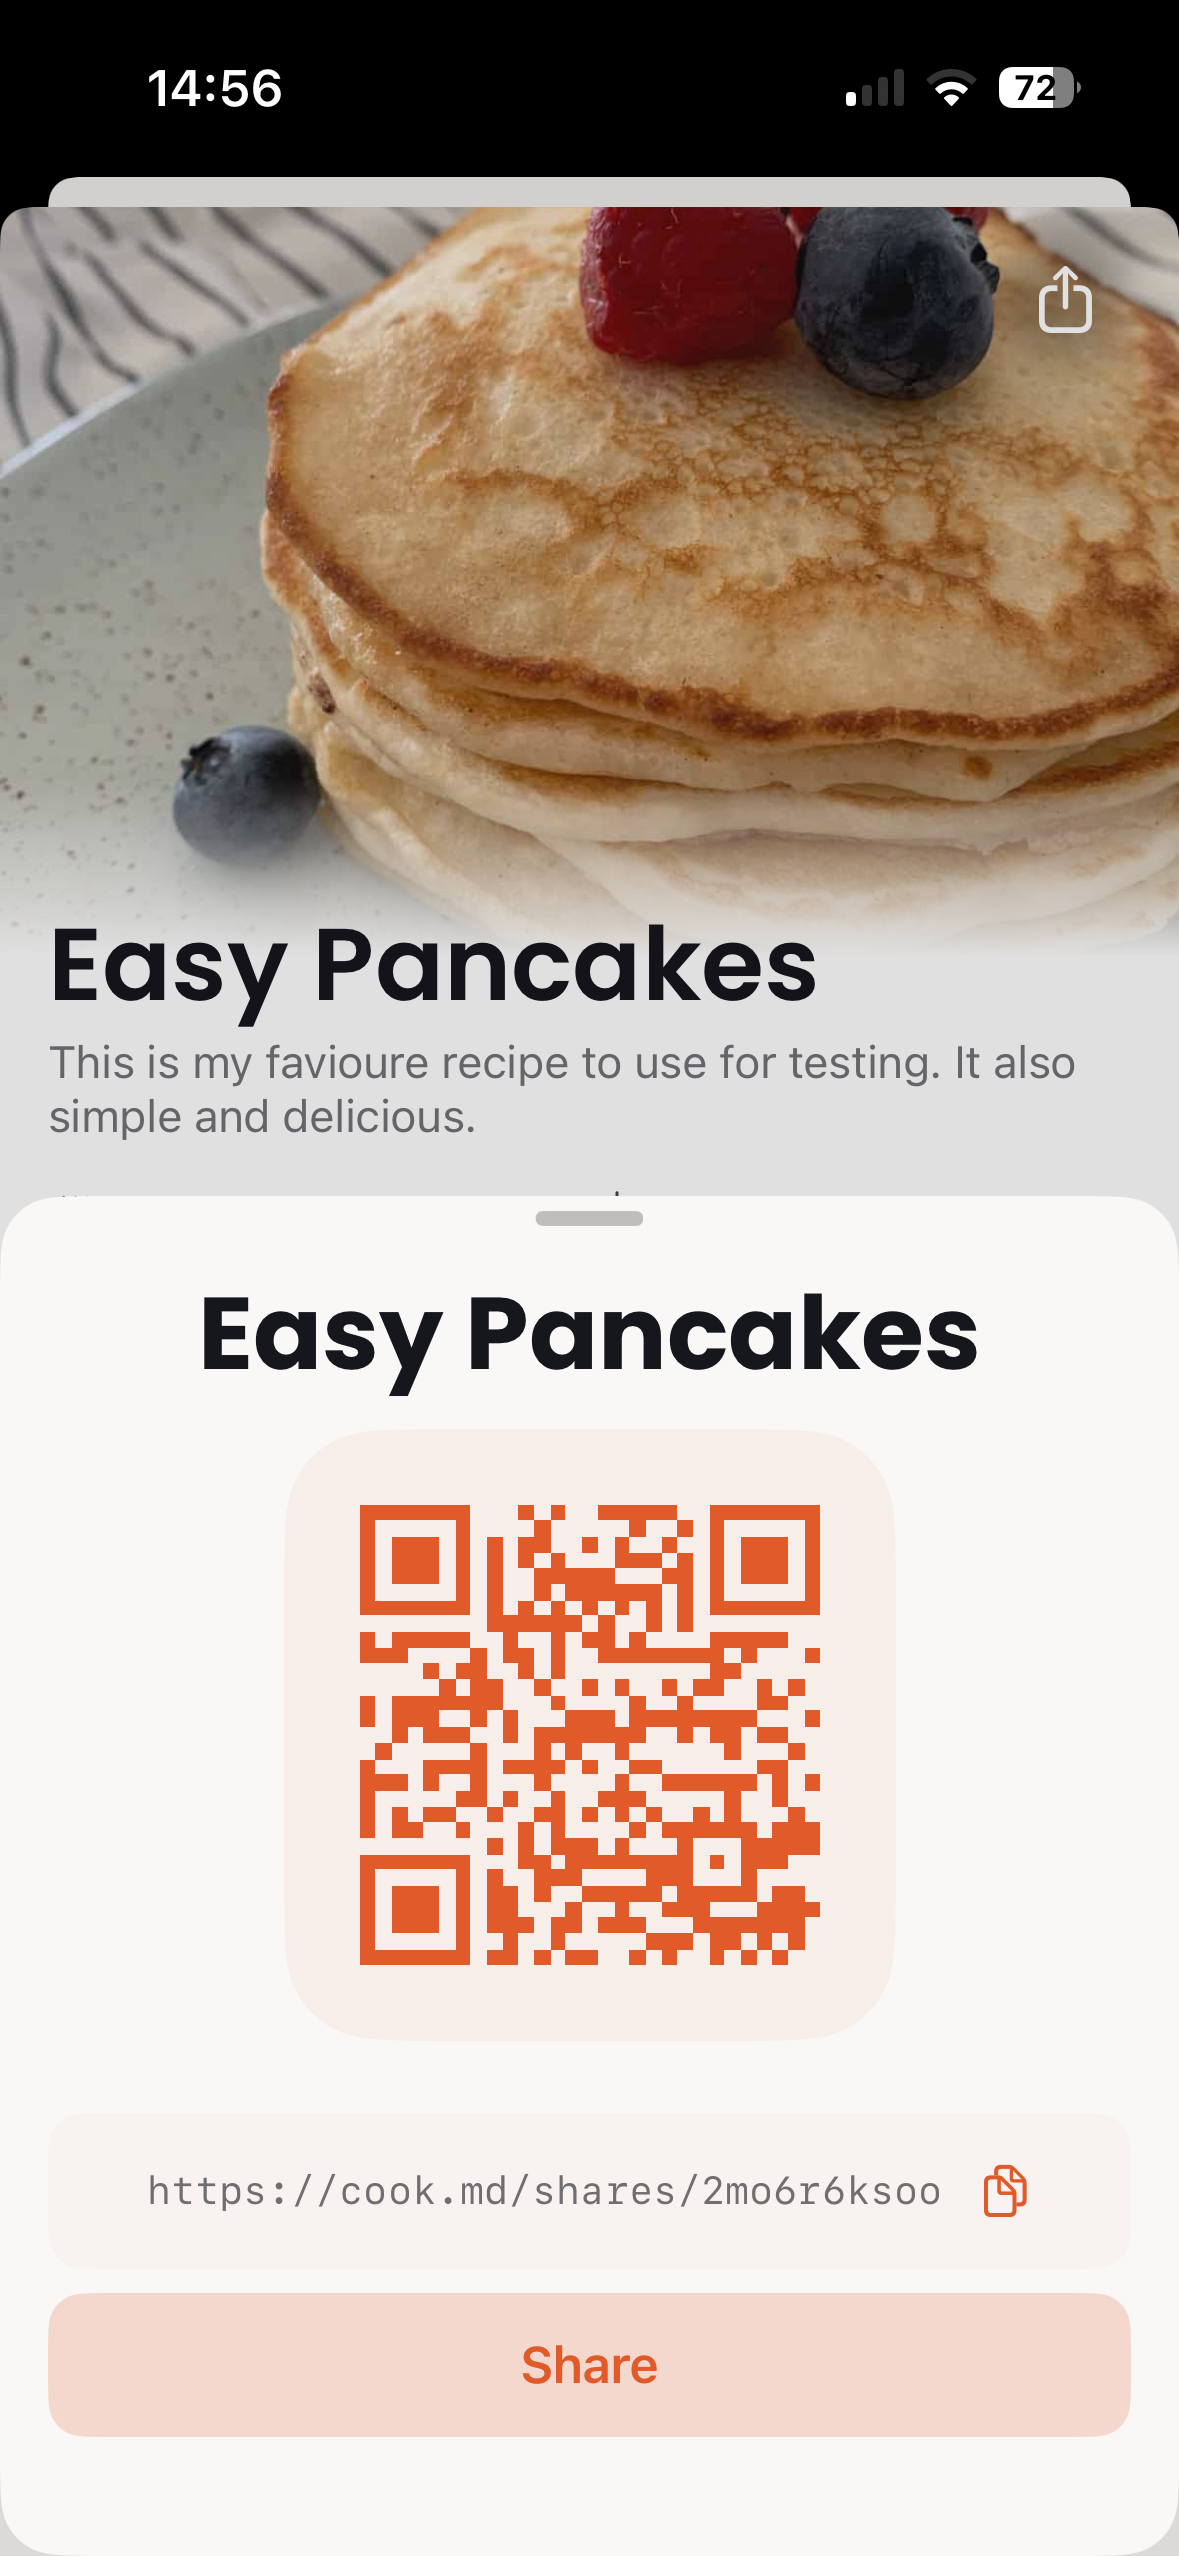
How to Share
- Open any recipe
- Tap the share icon in the top right corner
- A QR code and shareable link are generated automatically
- The recipient can scan the QR code or open the link in any browser
Scenario: You're hosting a dinner and a guest asks for the recipe. Just tap share, and they can scan the QR code right from the table - no need to dictate ingredients or look up the recipe later.
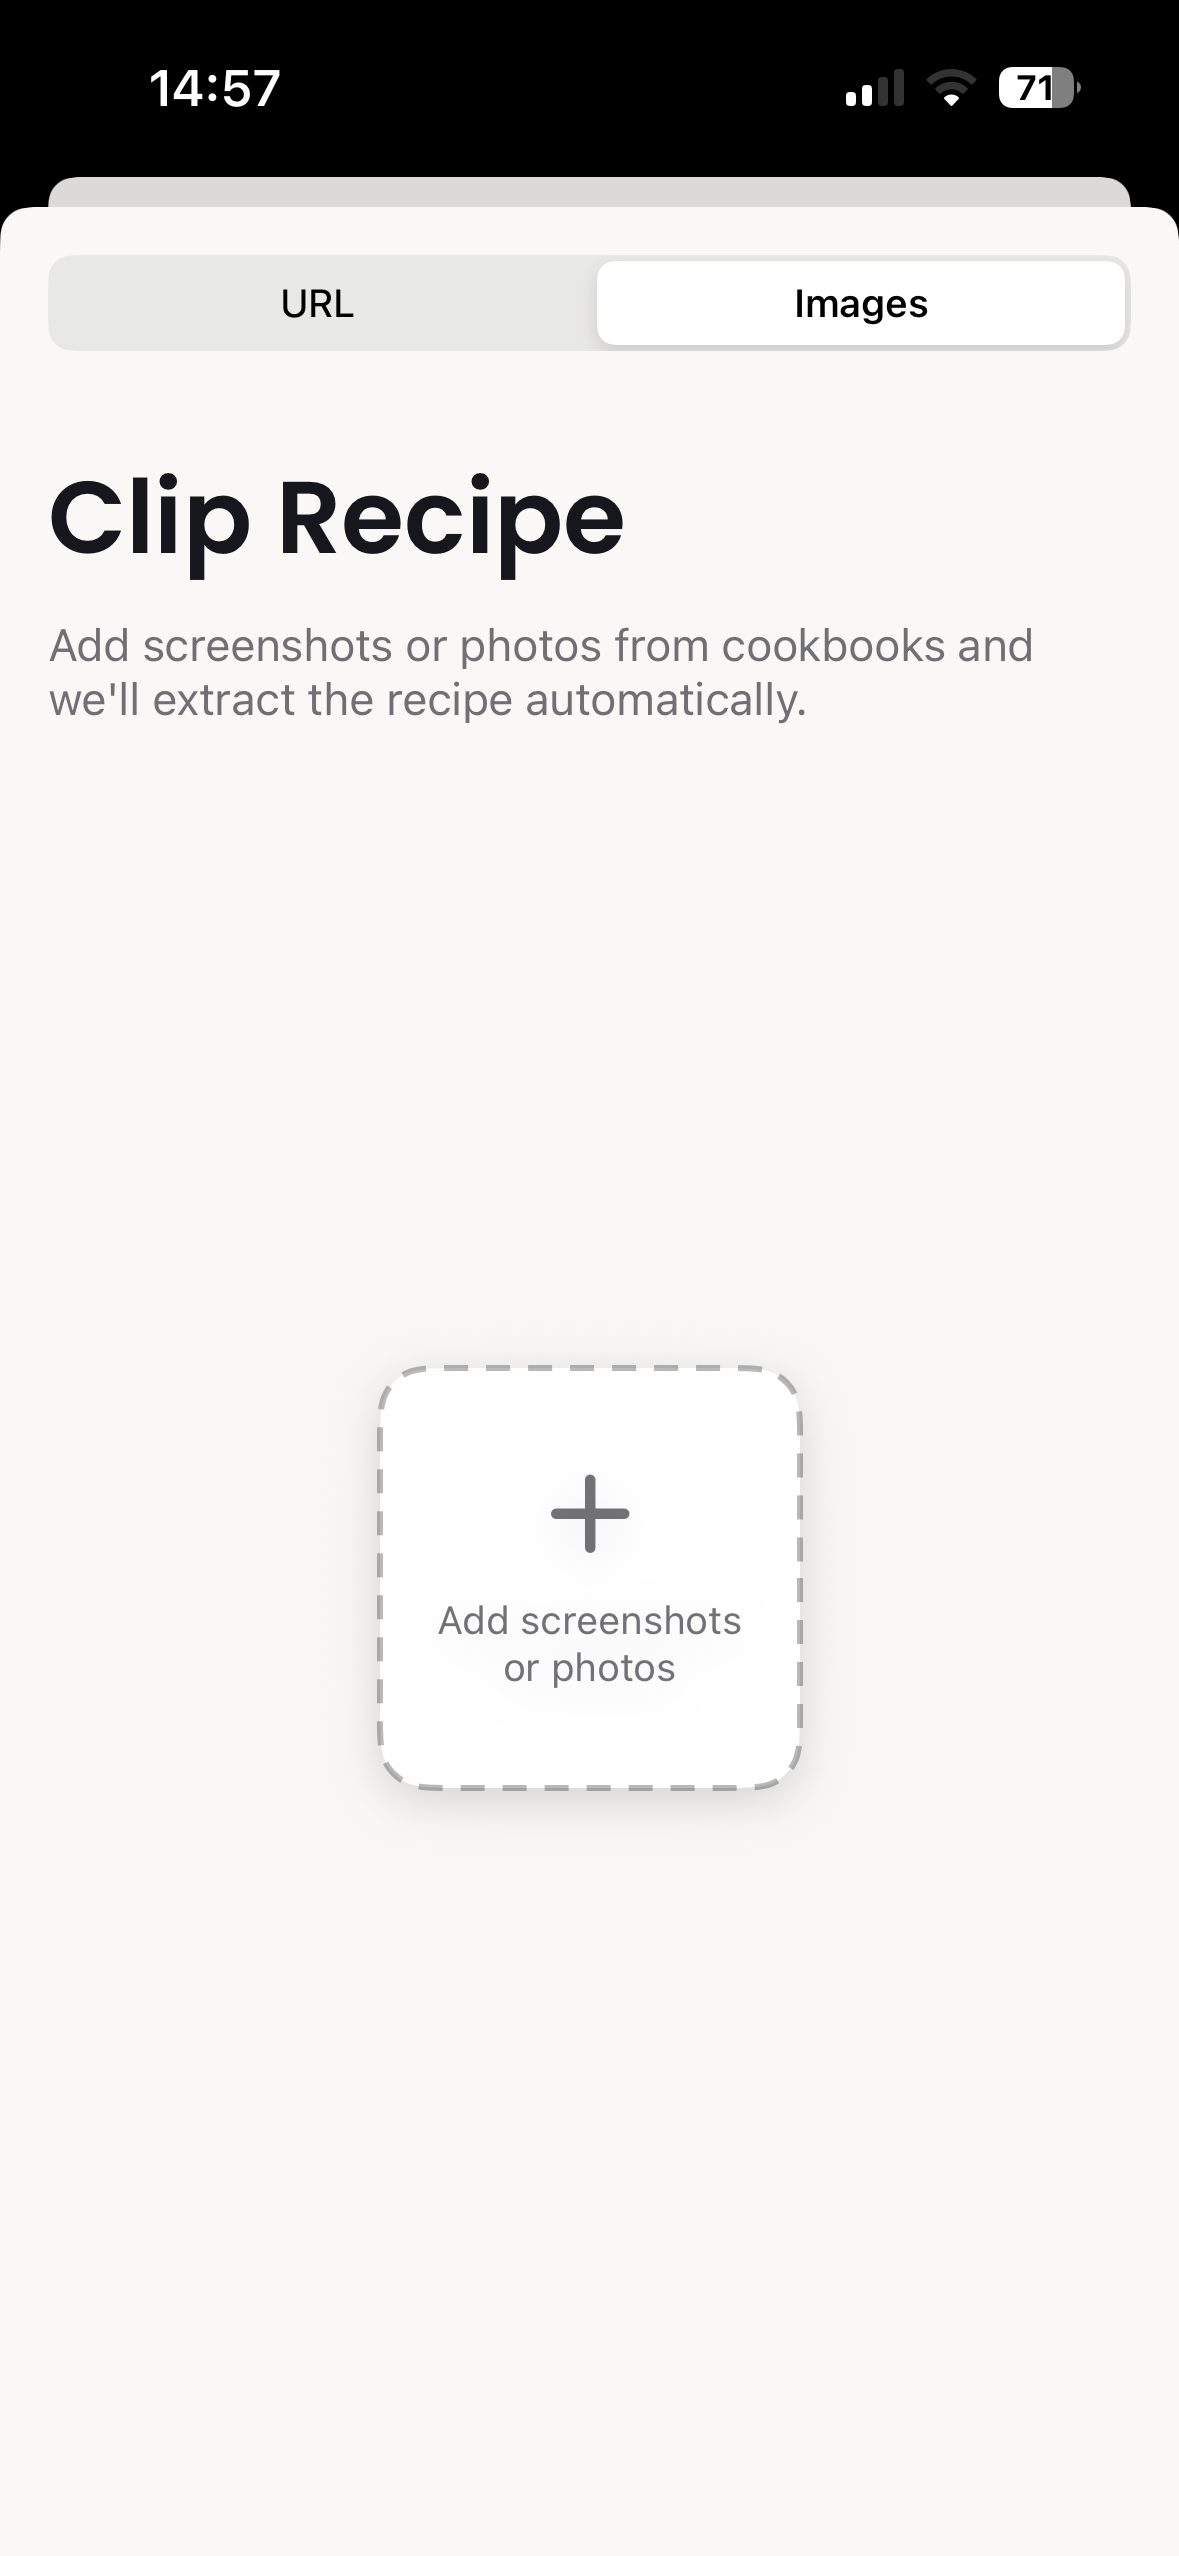
Clip Recipe
Found a recipe online or in a cookbook? Use Clip Recipe to import it into your collection automatically in Cooklang format.
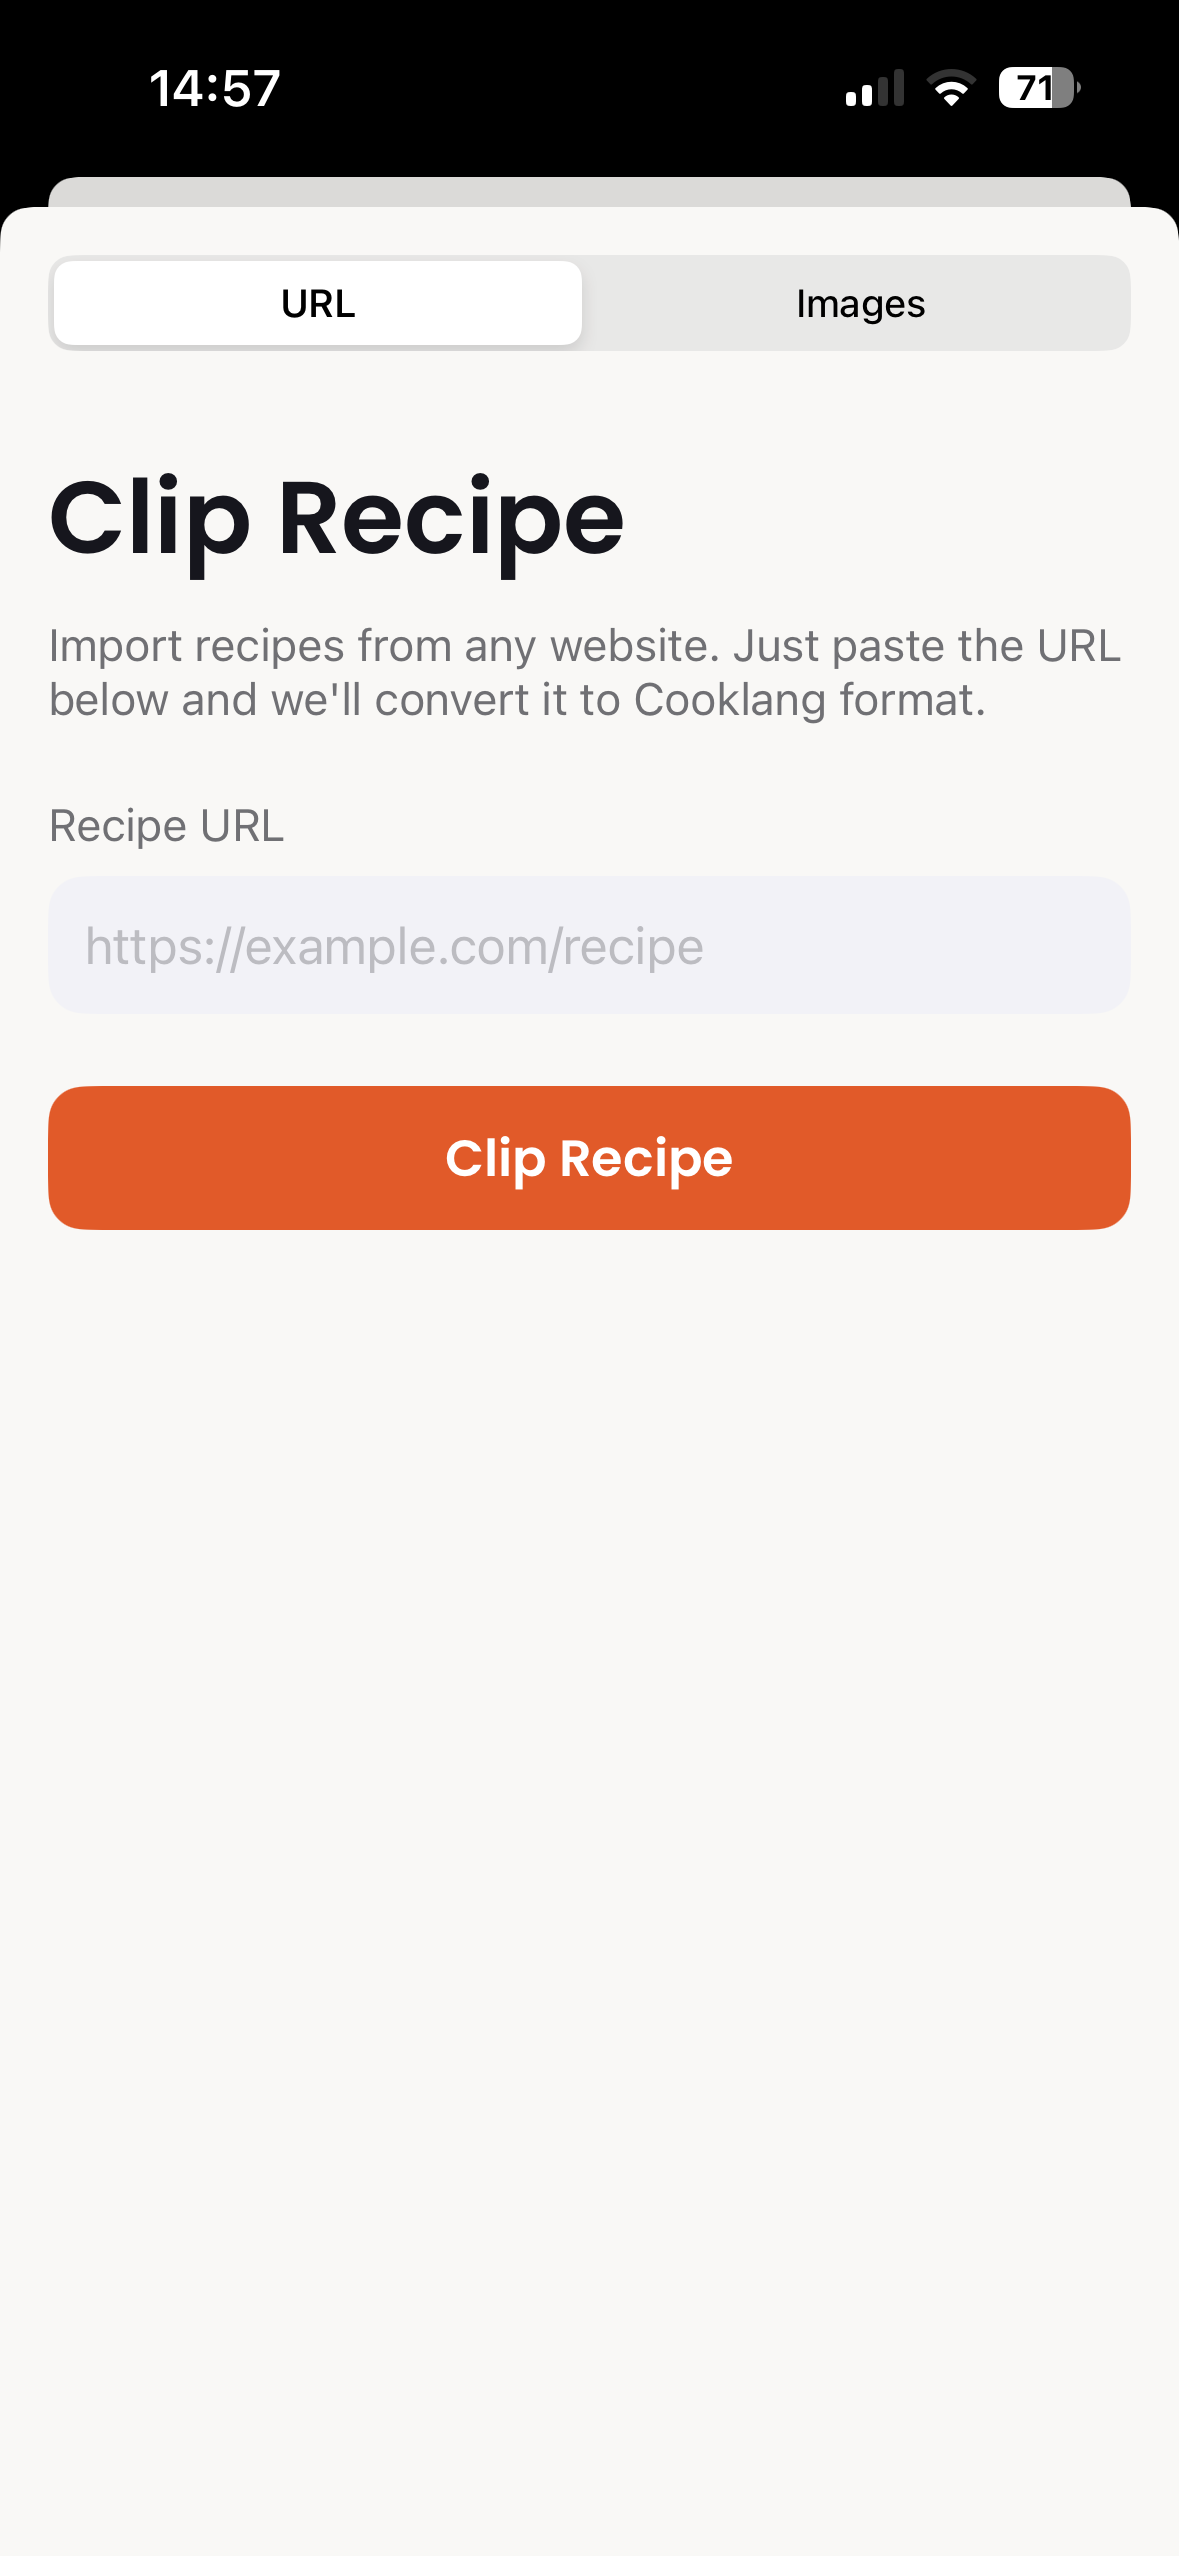
From a Website
- Tap the + button on the My Recipes screen
- Select the URL tab
- Paste the recipe URL
- Tap Clip Recipe - the app extracts ingredients, steps, and metadata automatically
From a Photo
- Tap the + button
- Select the Images tab
- Take a photo of a cookbook page or add screenshots
- The app uses AI to extract the recipe text and convert it to Cooklang format
Scenario: You're browsing a food blog and find a recipe you love. Instead of bookmarking the URL (which might change), clip it and it becomes a permanent part of your collection - accessible offline and synced to all your devices.
Scenario: You inherited your grandmother's cookbook and want to digitize her recipes. Snap a photo of each page, and Clip Recipe converts them into Cooklang format automatically.
Settings & Account
Access settings by tapping the gear icon on the My Recipes screen.
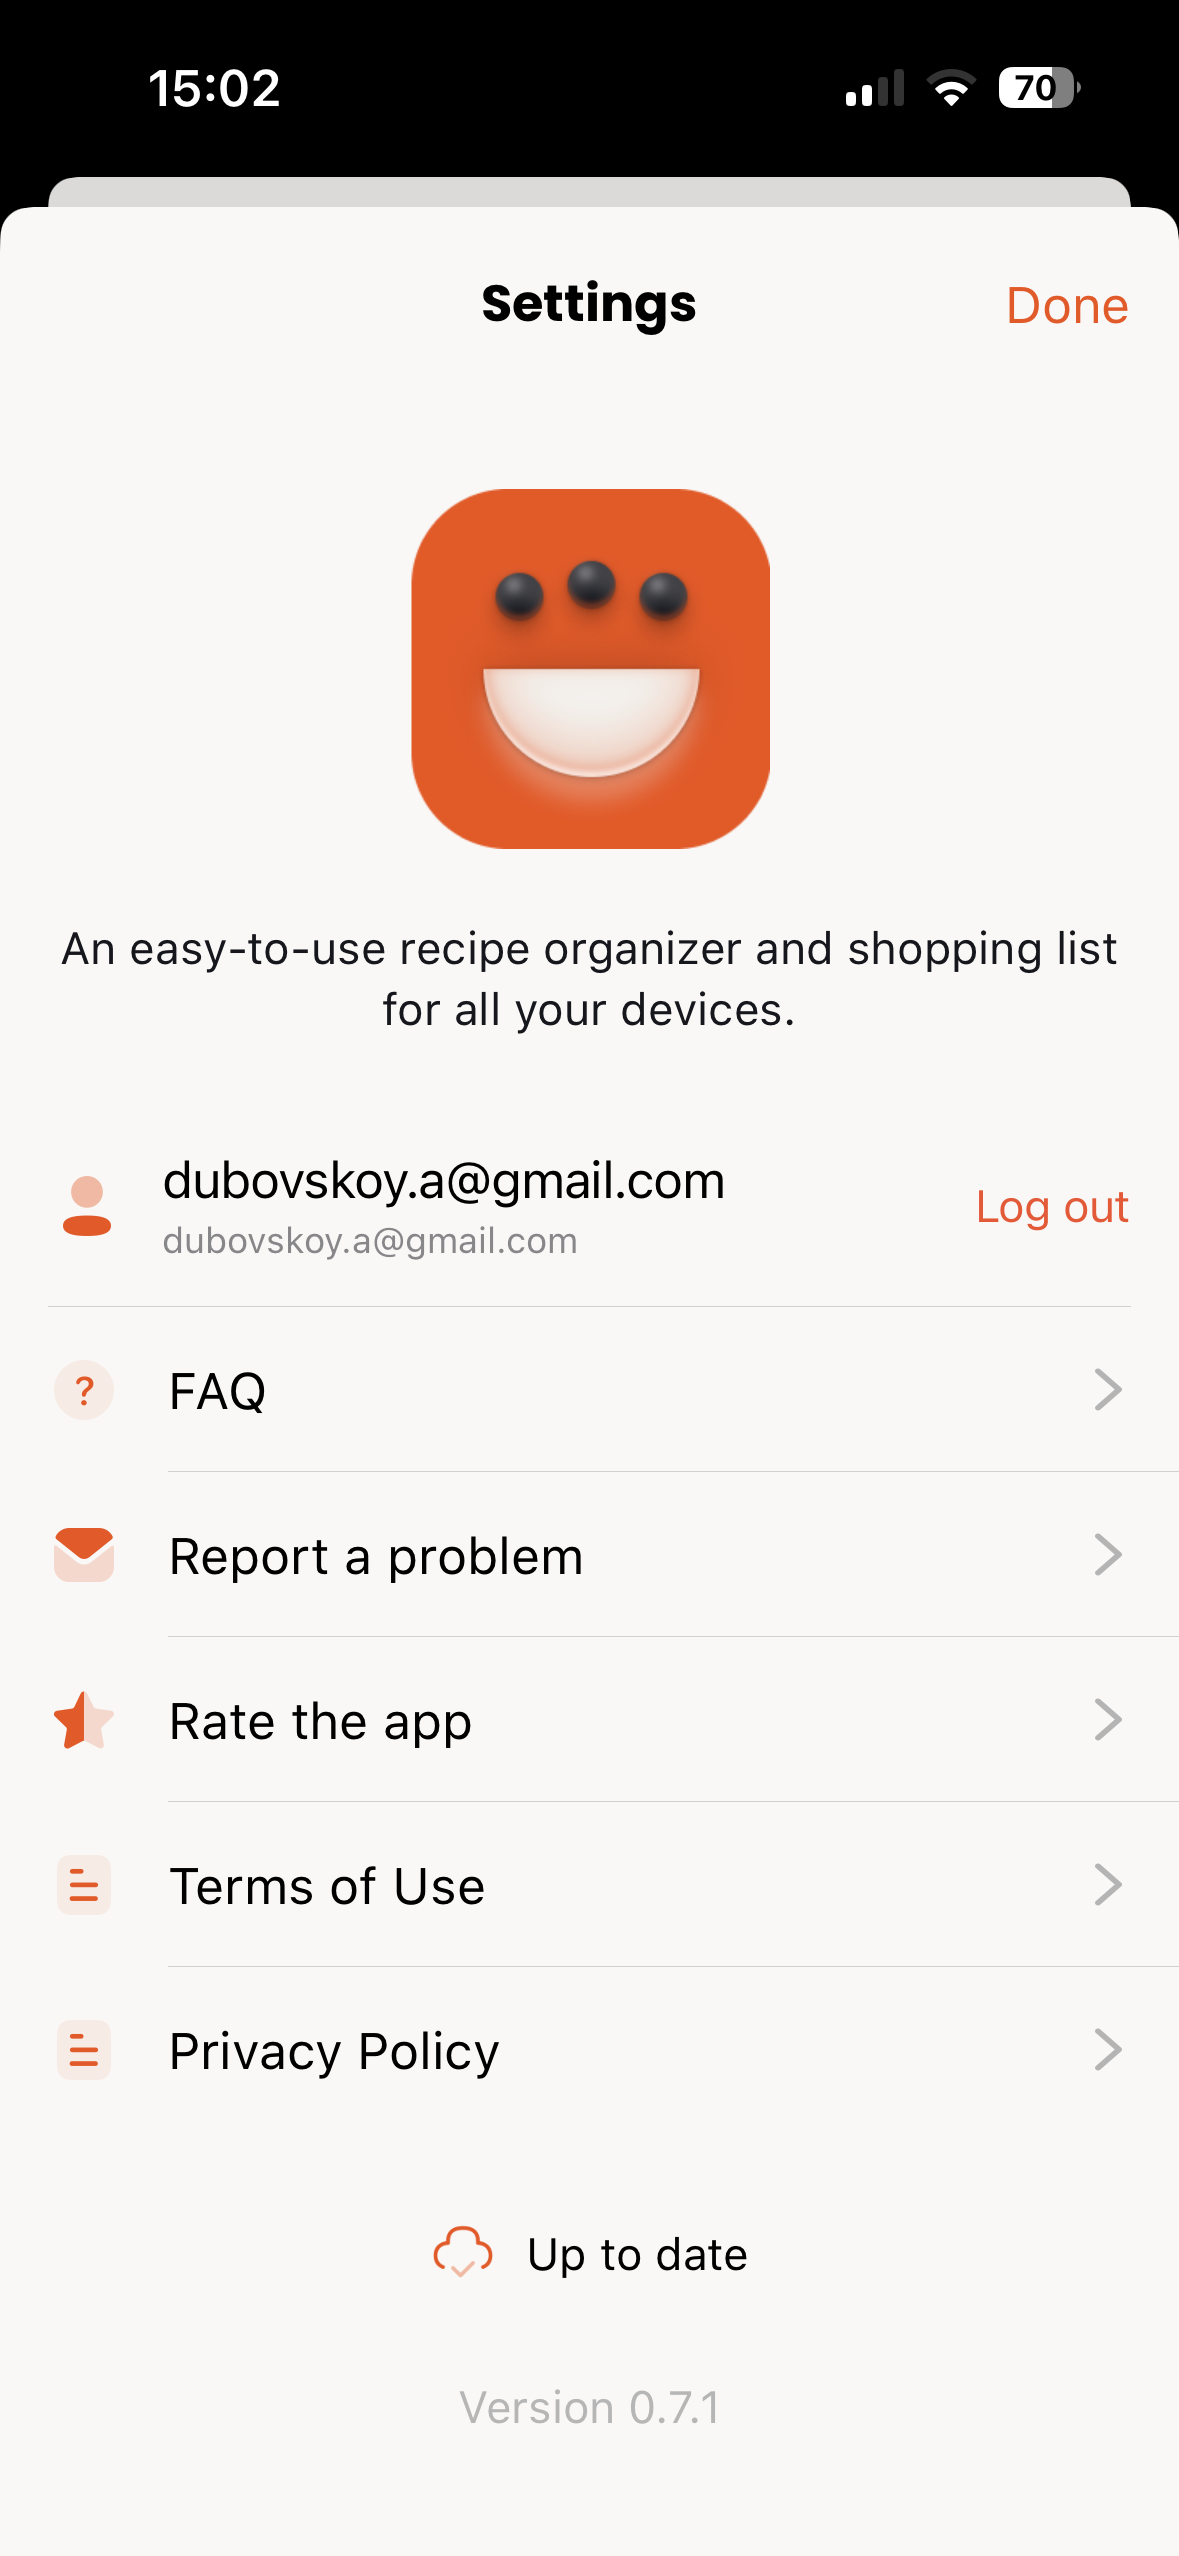
Account Information
View your account email and sign-out option. If using CookCloud, you'll see your account details here.
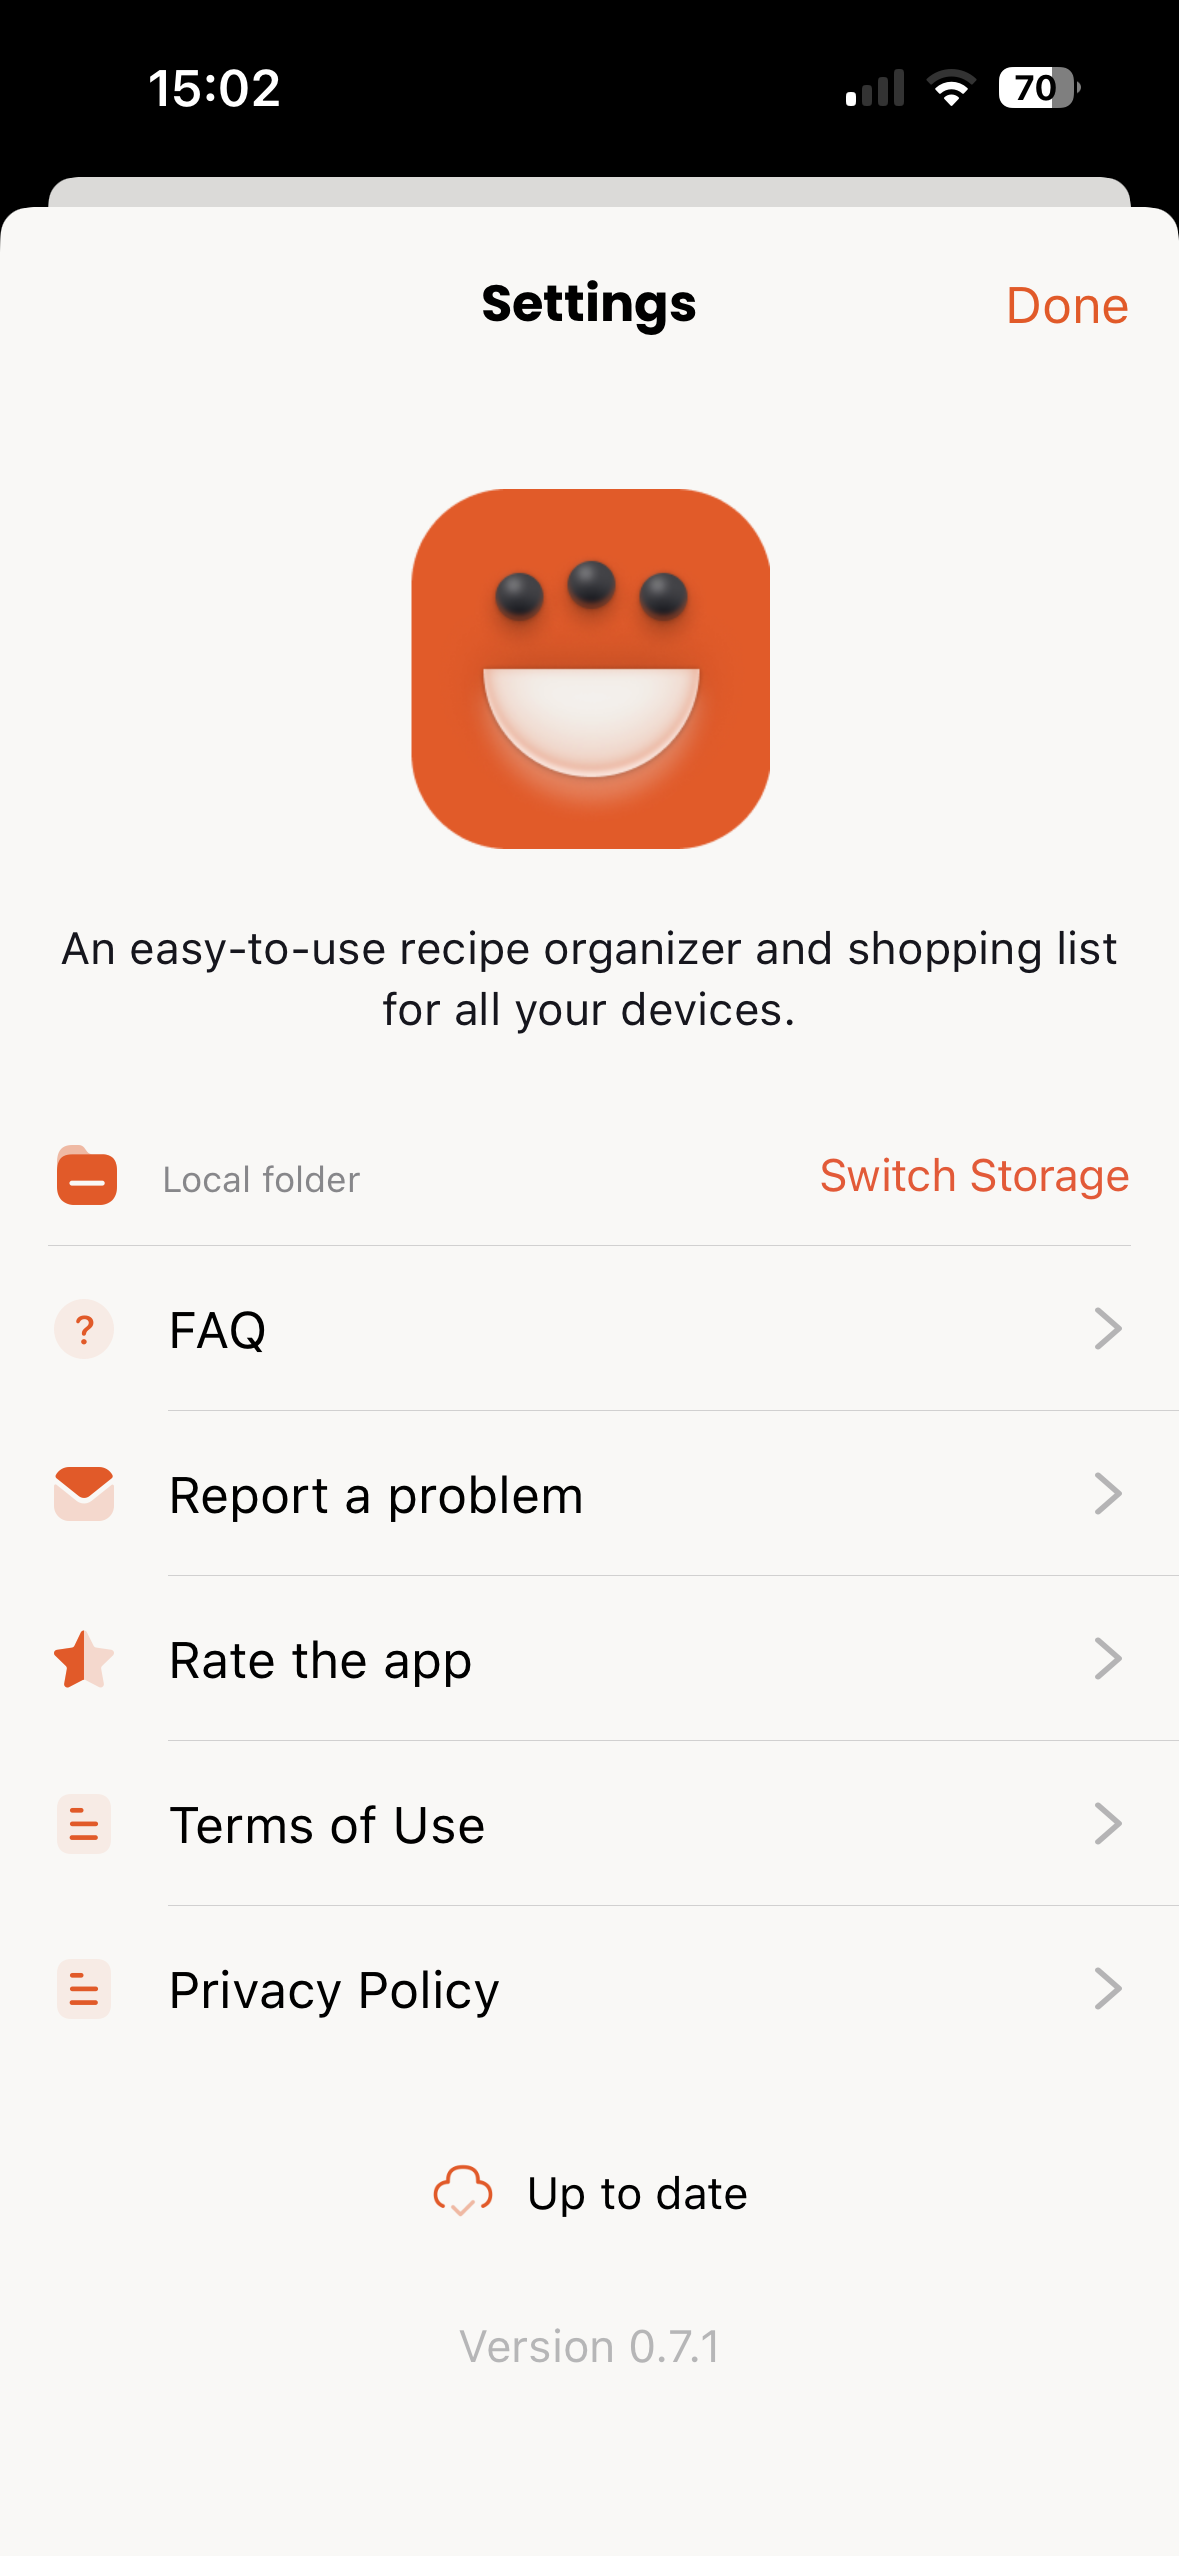
Sync Status
Check when your recipes were last synced. If there's a problem with sync, you'll see an error message here.
Manual Sync
Force a sync by tapping Sync Now. Useful if you've made changes on another device and want them immediately.
Help & Support
Access help documentation, FAQ, and contact support directly from settings.
About
View app version, terms of service, and privacy policy.
Having issues? Check out the Troubleshooting page for solutions to common problems.